It is vital to lock cells in Excel so that no one can modify the content of the protected cells without the owner’s permission. Therefore, if you also want to restrict someone from making changes to your Excel cells, just check out this blog. This article contains different ways to lock cells in Excel to prevent editing and make them protected.
So, let’s get started…
Quick Ways |
Step-By-Step Solutions Guide |
|
Way 1- Lock Cells In Excel Worksheet |
Choose the cells >> go to the Home tab and then from the Alignment…Complete Steps |
|
Way 2- Lock Some Specific Cells In Excel |
Choose the entire worksheet >> go to Home tab >> hit sign of the dialog box launcher…Complete Steps |
|
Way 3- Lock Excel Cells Using VBA Code |
Choose entire cells in Excel spreadsheet >> go to the Home tab >> cells >> Format…Complete Steps |
|
Way 4- Protect Entire Worksheet Except Few Cells |
Press Control + 1 key >> in the opened Format Cells dialog box >> go to ‘Protection’...Complete Steps |
|
Way 5- Lock Formula Cells |
Choose Format Cells >> go to Protection tab >> untick Locked option >> OK…Complete Steps |
To repair & recover corrupted Excel file data, we recommend this tool:
This software will prevent Excel workbook data such as BI data, financial reports & other analytical information from corruption and data loss. With this software you can rebuild corrupt Excel files and restore every single visual representation & dataset to its original, intact state in 3 easy steps:
- Try Excel File Repair Tool rated Excellent by Softpedia, Softonic & CNET.
- Select the corrupt Excel file (XLS, XLSX) & click Repair to initiate the repair process.
- Preview the repaired files and click Save File to save the files at desired location.
What’s The Need To Lock Cells In Excel?
The plus point of locking cells in Excel is that it protects your data from unwanted changes.
Suppose you have to share your Excel spreadsheet with other users, and there are some specific cells which you don’t want to get modified. In that case, cell lock is the best trick to avoid formula and formatting changes like issues.
How To Lock Cells In Excel?
Way 1- Lock Cells In Excel Worksheet
Follow the below-mentioned solutions to do so:
- Choose the cells which you need to lock.
- Go to the Home tab and then from the Alignment group tap to the small arrow present across it. This will open the windows of Format Cells.
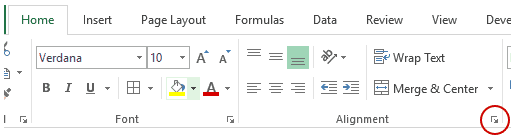
- Now in the format cell window go to the Protection tab and choose the check box of Locked After that tap to the OK button to shut off this popup window.

Note: If you are attempting these steps on the worksheet or workbook which you haven’t protected then you will find that the cells are locked already. This implies that the cell can also be locked when the workbook or worksheet is protected.
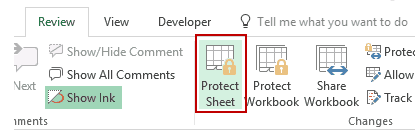
- From the excel ribbon hit the Review After that from the Changes group, you have to choose either the Protect Workbook or Protect Sheet.

- Next, you have to reapply the protection over your workbook or worksheet.
Tip: well it’s a best solution to unlock cells which you need to modify before protecting a workbook or worksheet. But don’t get worried as you can unlock them easily even after applying protection over it. For removing up the protection, all you need to do is just remove the applied password.
Way 2- Lock Some Specific Cells In Excel
Sometimes you just need to lock some individual cells which contain important data or formulas. In such cases, only protect the cells which you need to lock leaving the rest one as it is.
By default, entire cells are comes locked, so if you apply protection to your sheet then entire cells are also get locked.
So, make sure that only those cells are protected which you want to lock and after that only apply protection to the whole worksheet.
Follow the steps to lock some specific cells in Excel
- Choose entire worksheet and then go to the Home tab.
- After that hit, the sign of the dialog box launcher presents the alignment group.
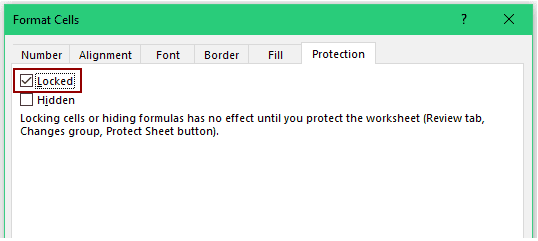
- Now in the opened dialog box of Format Cells, got to the Protection tab and uncheck the Locked option. Hit the OK button.
- Choose the cells which you need to lock.
- Again make a tap over the dialog box launcher present in the Alignment group which is under the Home tab.
- Now again in the opened dialog box of Format Cells go to the Protection tab and make a check mark across the Locked option.
- Doing this will unlock entire cells of your worksheet except the one which you have selected for locking.
- Now go to the Review tab and then from the Changes group hit the Protect Sheet option.
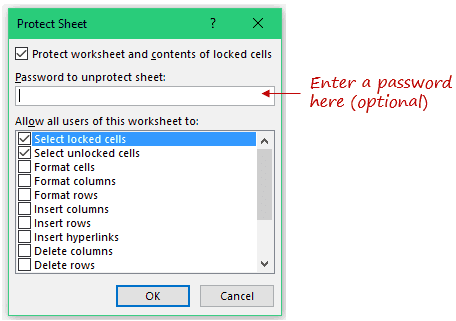
- From the opened dialogue box of Protect Sheet:
- Check whether the option of ‘Protect worksheet and contents of locked cells’ is checked or not. If it’s not then check it.

- Enter the password to apply password on your sheet.

- Now specify the permission which you want to assign to other users. By default, you will see that the first two options are already selected. Using which user can easily make selection for the locked or unlocked cells.
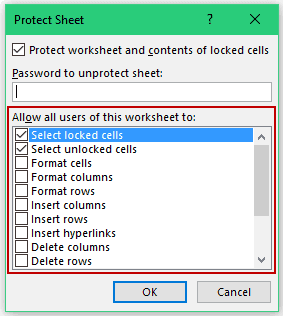
- Apart from this you can also allow other options like inserting rows/columns or making changes in the formatting.
- Tap to the OK button.

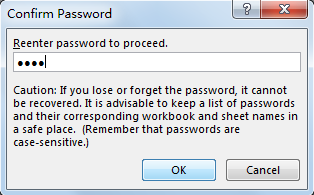
If you are applying any password then you are asked to reconfirm it.
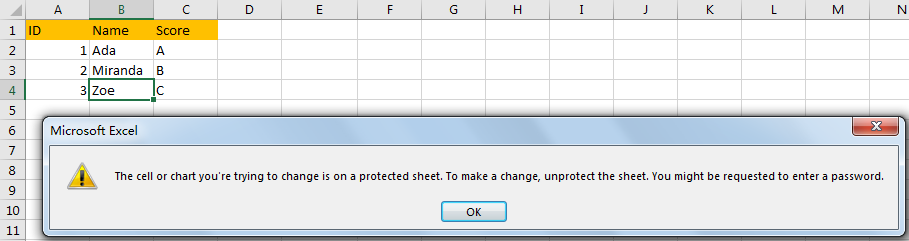
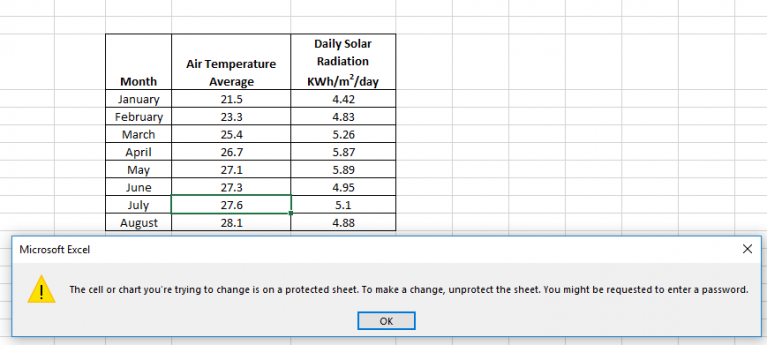
When the next time you try to edit those specific cells, you will get the following error message pop-up dialog box.
Way 3- Lock Excel Cells Using VBA Code
- Choose entire cells in your Excel spreadsheet.
- Now go to the Home tab first and then to cells from this cell section tap on the Format option and choose the format cells option.

- This will open a Format Cells dialogue box. On this opened dialog box, you need hit the Protection tab. Here you have un-select the option Locked.

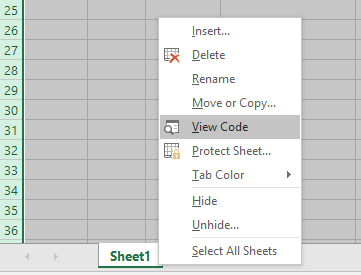
- Now in your Excel file where name of your sheet appears. Make a right click from your mouse and choose the View Code.
- This will open Microsoft Visual Basic for Applications dialogue box. In this opened white sheet along with the dialogue box, you just need to type the below code.
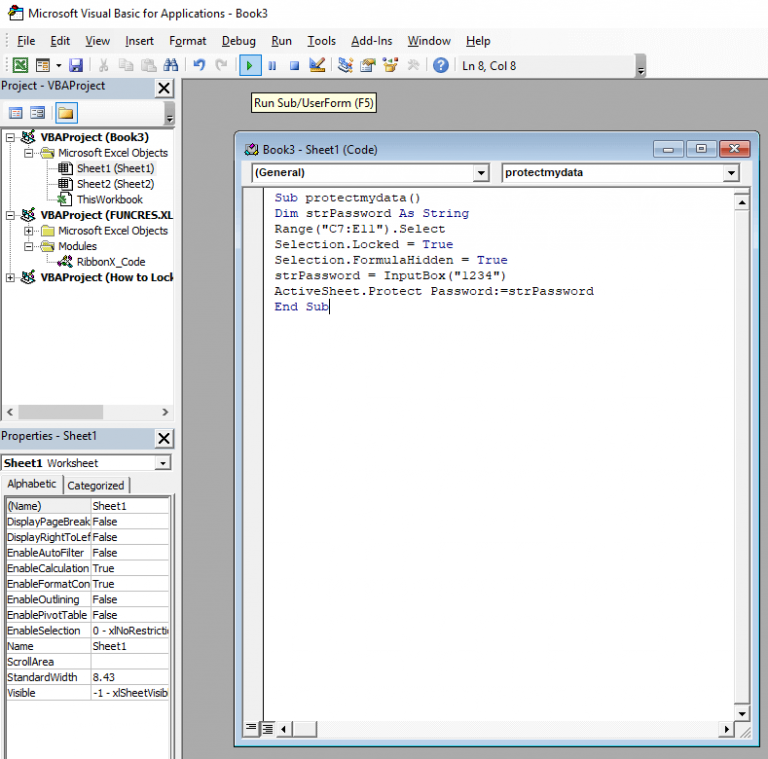
- In the written code, we have selected the data range from C7 to E11. And have also applied a password like, 1234.
- After entering the complete code go to the Debug Here you will find a Run Sub/User Form (F5) option tap on it.
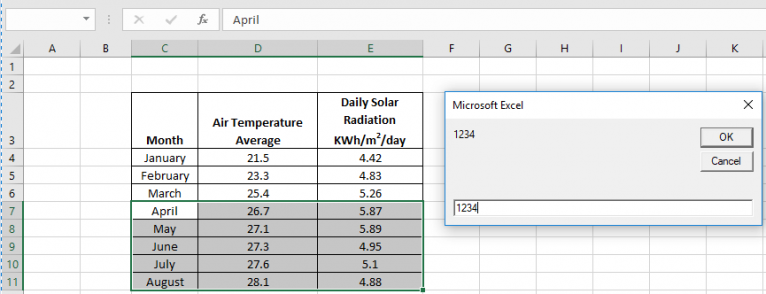
- Now you will see that your Excel worksheet is opening along with a password window.
- So, write same password that you as allotted in the VBA code eg: 1234.
- After doing this whenever you approach for making changes in the desired cells of the Excel. This will throw a warning message stating that “you can’t edit the cells as it is protected”.
Note: To unlock the cells locked with Excel VBA code you have to follow the same unlocking procedures as explained earlier.
Also Read; Top 3 Methods To Unlock Password Protected Excel File
Way 4- Protect Entire Worksheet Except Few Cells
In some cases, people also want to protect the entire worksheet by keeping some of the cells unlocked.
Well, such a situation arises when you have added interactive features in your worksheet like a drop-down list. And you want that your drop-down keeps working even when the worksheet is protected.
To accomplish this task, just follow the below-mentioned steps:
- Make a selection of the cells which you want to keep unlocked.
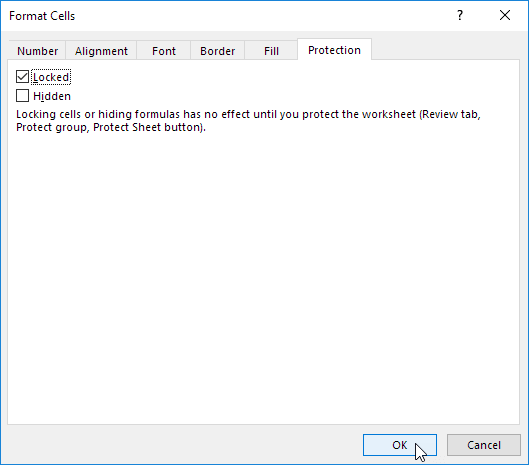
- Press the Control + 1 key from your keyboard.
- In the opened Format Cells dialog box go to the ‘Protection’.

- Unselect the Locked option and hit the OK button.
Now if the entire worksheet is kept protected, these particular cells should work normally.
For this you have to perform the following steps, so as to protect the entire worksheet except the selected cells:
- Hit the Review tab and then from the Changes group tap to the Protect Sheet icon.
- In the opened Protect Sheet dialog box:
- Check whether the option of ‘Protect worksheet and contents of locked cells’ is checked or not. If it’s not then check it.

- Enter the password to apply password on your sheet).
- Now specify the permission which you want to assign to other users. By default, you will see that the first two options are already selected. Using which user can easily make selection for the locked or unlocked cells.
- Apart from this you can also allow other options like inserting rows/columns or making changes in the formatting.

Way 5- Lock Formula Cells
To lock formula cells, the very first thing you need to do is unlock all the cells and then only lock the cells having the formula in it. At last protect the sheet.
Well if you don’t know how to perform all these tasks then follow the below steps:
- Choose entire cell of your worksheet.

- Now make a right click and from the listed option choose the Format Cells.
- On the opened format cell window go to the Protection tab and untick the check box of Locked option. After that hit the OK button.

- Go to the Home tab and then from the Editing group choose the Find & Select.

- Hit the Go To Special option.

- Choose Formulas and hit the OK button.
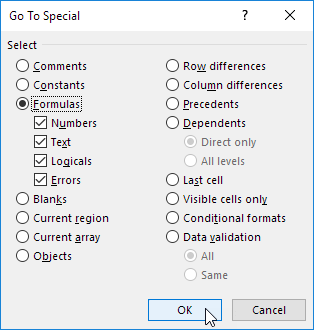
You will see that after doing these steps Excel will selects all the formula cells.

- Press the CTRL + 1 button from your keyboard.
- Go to the Protection tab and select the check box of Locked option. After that press the OK button.
Note:
If you select the check box of Hidden option then the user will not be able to see the formula within the formula bar even after choosing the formula cells.
Always keep in mind that locking cells doesn’t have any effect until and unless the worksheet is protected.
- So now it’s time to protect your Excel sheet.
After this, you will see that entire the formula cells are been locked. In case of editing these cells, firstly you need to unprotect the worksheet.
Use Excel Repair Tool to Repair/Recover Corrupted Excel Documents
MS Excel Repair Tool is a special tool that is specifically designed to repair any sort of issues, corruption, errors in Excel file. This can also easily restore entire lost Excel data including cell comments, charts, worksheet properties, and other related data.
It is a unique tool that can repair multiple corrupted Excel files in one repair cycle and restore data to a new blank Excel file or the preferred location. The tool has the ability to recover data without modifying the original formatting.
- The interface is very simple, with a large toolbar of buttons to add files or folders to the application.
- With this software, you can repair your corrupted Excel file.
- It can easily restore all corrupt excel files and also recover everything which includes cell comments, charts, worksheet properties, and other related data.
- The corrupted excel file can be restored to a new blank Excel file.
- It has the ability to recover the complete Excel file data from the file and restore them even without modifying the original formatting.
Steps to Utilize MS Excel Repair Tool:


Frequently Asked Questions:
Can I Lock Multiple Cells in Excel?
Yes, you can lock multiple cells in Excel through freeze panes. Apart from that, you can use a shortcut key- F4 to lock specific columns or rows in the document as well as the range of cells that you want to lock.
Are You Able to Lock Some Cells in an Excel Workbook and Not Others?
Yes, on the Excel worksheet, you have to select only the cells you want to lock. Now, bring up the Format Cells window by pressing (Ctrl+Shift+F). At this time, go to the Protection tab, check the Locked box >> select OK.
How Do I Make a Cell Non-Editable in Excel?
To make a cell non editable in Excel, you need to make cell as read only using VBA code. Although using the VBA code helps to make cell as read-only so that no one can edit them and even you don’t have to lock the cells to protect your worksheet data.
What Are the Three Different Ways to Protect Your Workbook?
The three different ways to protect your workbook are:
- Password Protection (File Level)
- Protect Workbook Structure
- Lock Cells and Protect Sheet
Does F4 Lock Cells in Excel?
Yes, the F4 key is a shortcut mode or we can say the easiest way to lock cells in the MS Excel.
Bottom Line
Locking cells in Excel help you to keep the formula completely safe from being tempered by any third-party user.
Hopefully, this informative tutorial seems helpful to you on how to protect cells in excel without protecting sheets. Don’t forget to leave a comment if you have any queries or tips to share about how to lock cells in Excel and protect them.

Priyanka Sahu
Priyanka is a content marketing expert. She writes tech blogs and has expertise in MS Office, Excel, and other tech subjects. Her distinctive art of presenting tech information in the easy-to-understand language is very impressive. When not writing, she loves unplanned travels.