If you want to prevent your Excel spreadsheet data from being modified by any other user, then don’t fret, you are in the correct place. This guide will teach you how to protect Excel sheet from editing. Whether you’re sharing sensitive information or collaborating with others, protecting your Excel sheets using the methods mentioned here ensures accuracy and prevents accidental changes.
So, let’s get started…
To fix corrupt Excel files, we recommend this tool:
This software will prevent Excel workbook data such as BI data, financial reports & other analytical information from corruption and data loss. With this software you can rebuild corrupt Excel files and restore every single visual representation & dataset to its original, intact state in 3 easy steps:
- Try Excel File Repair Tool rated Excellent by Softpedia, Softonic & CNET.
- Select the corrupt Excel file (XLS, XLSX) & click Repair to initiate the repair process.
- Preview the repaired files and click Save File to save the files at desired location.
What Does Protect Sheet Do in Excel?
Protecting the Excel spreadsheet helps to prevent other users from viewing unseen worksheets, adding, deleting, moving, or hiding worksheets, and giving new names to worksheets. However, it is important to password-protect your sheet and work to avoid unauthorized access to the sheet.
Let’s understand this more clearly with an example:
Suppose you have maintained a report of team status in your worksheet. In which you want that your team member will add data only in specific cells and won’t modify any other data of your worksheet.
In such cases, Excel worksheet protection will only make certain parts of your sheets editable. Thus, none of the users will be able to make changes in any other sections of the worksheet.
How to Protect Excel Workbook From Editing?
There are various ways to protect Excel workbook from editing. But it’s up to you whether you want to apply security to your Excel workbook, file, Worksheet, or in specific cells.
- Protect Excel File From Editing
- Protect Excel Workbook From Editing
- Protect Excel Worksheet From Editing
- Protect Excel Workbook’s Structure From Editing
- Protect Excel Cells From Editing
Trick 1# Protect Excel File From Editing
“Mark As Final” Excel option is used for Protecting Excel File From Editing by another user. It’s like a reminder more than protecting Excel by turning OFF the typing-editing commands.
One can easily identify that the Excel file is protected from editing by seeing the marked as final icon which appears on the status bar.
Steps to apply Mark As Final for protecting Excel File from editing:
- Just open the Excel file in which you want to apply this mark as final option.
- Tap to the following: file > Info > Protect Workbook > Mark as Final options.

- Hit the ok button to save and apply the changes.
Trick 2# Protect Excel Workbook From Editing
If you want to protect the complete of your workbook from editing then you have two options to perform.
- Encrypting your Excel Workbook with the Password
- Making your workbook read-only
1. Encrypt Excel Workbook With A Password
To protect Excel Workbook from editing the very first option is to encrypt the workbook with some password.
So that whenever anyone else tries to open your Excel workbook, firstly they need to enter the password.
Note: try you need to set some tough Password that no one can guess.
Steps to encrypt Excel workbook with a password:
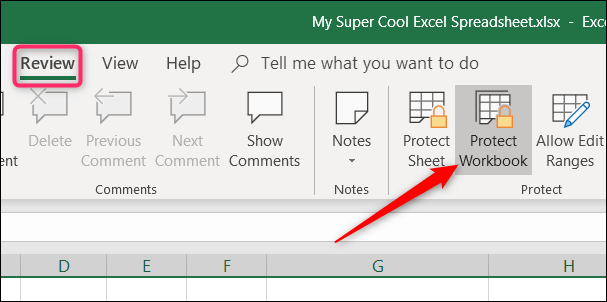
- Open your Excel file and click on the following options: File>info>Protect Workbook.
- From the Protect Workbook drop-down options choose the “Encrypt with Password”.
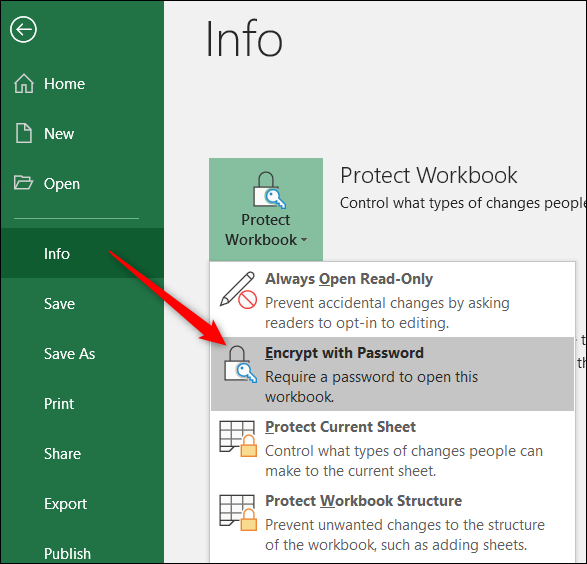
- In the opened window of Encrypt Document, just enter the password which you want to set. After that click to the ok.

Note: read the caution lines carefully and set the password that you don’t forget.
- For the password confirmation, you are asked to enter the password two times. After that click the OK button.

- To check whether your Excel workbook gets encrypted properly or not, You need to close your already opened workbook and re-open it again.

If later on, you want to remove password from Excel workbook then follow the steps given in this tutorial: Top 3 Methods To Unlock Password Protected Excel File
2. Make A Workbook Read-Only
Making Excel workbook read-only is very easy. This option doesn’t give any real protection so any user who is opening the file can easily enable the editing option. But it will give suggestions to the other user for being careful while making changes in the file.
- At first, Open your Excel workbook which you want to make read-only.
- Now Go to the file > info> Protect Workbook.
- Now from the drop-down options of Protect Workbook choose the “always open read only”.

- After applying this, whenever anyone tries to open the Excel file, they will get the warning that the file is opened in read-only mode.

- For removing up this read-only setting, just go to the File > Protect Workbook Now toggle the “Always Open Read-Only” setting off.
Helpful Article: 7 Quick Ways To Fix Excel File Read Only Error
Trick 3# Protect Excel Worksheet From Editing
Another option of preventing Excel workbook from editing is by protecting each individual worksheet.
Using this option you can easily lock all the cells from being edited by anyone. Protect Excel Worksheet means no one can edit or delete its content.
Follow the below steps to Protect Excel Worksheet From Editing:
- From the Excel ribbon tap to the “Review” tab.
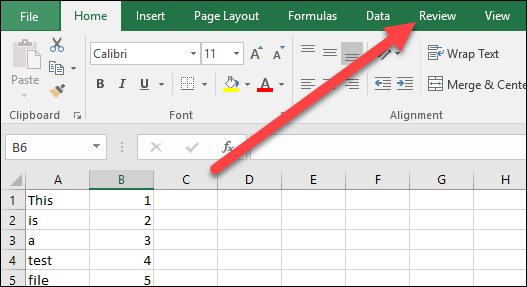
- Now from the changes group make a tap on the “Protect Sheet.”

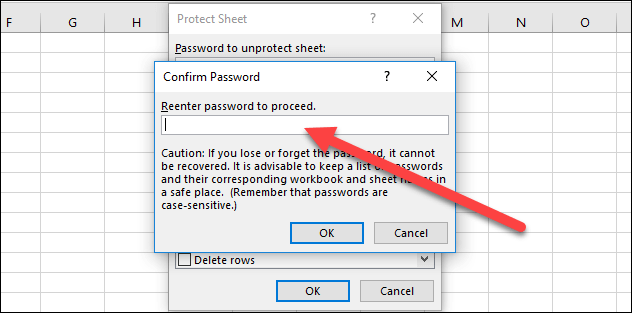
- Assign the password which you want to set for unlocking your Excel sheet in the future again.

- Enter the password one more time to make a confirmation and hit the ok.
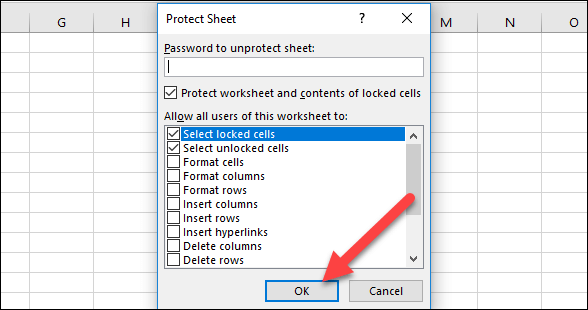
- Choose the permissions from the listed option of “allow all users of this worksheet to” and then click the ok.
- For removing up the protection, go to the “Review” tab and hit the button “Unprotect Sheet”.
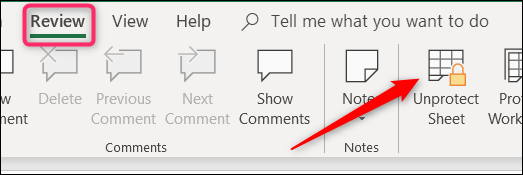
- Enter the password and click the “OK” button.

- Now your sheet is unprotected. So you have to apply for the protection again whenever you need it.
Trick 4# Protect Excel Workbook’s Structure From Editing
Another option to prevent workbook from editing is by protecting the Excel workbook’s structure.
Follow the steps to Protect Excel Workbook’s Structure From Editing:
- Go to the File menu in your opened Excel file. After that click on the following: Info> Protect Workbook> protect workbook structure.

- Assign the password and click the “OK”.

- Re-enter the password again for confirmation and click “OK.”

- After applying this option, anyone can open your Excel document but they can’t access its structural commands.
- If another user knows your password, they can easily access these commands. Only they need to make click over the “Review” tab and tap on the “Protect Workbook”.
- After that, they have to enter the password and now the structural commands get available.

This action will remove your Excel workbook structure protection from the document. To restate it, just go back to the File menu and protect your workbook once more.
Trick 5# Protect Excel Cells From Editing
If you want to protect only specific cells of your Excel sheet from editing then locking those cells is the best option.
Apply the following steps to protect specific cells from editing:
- Choose the cells which you want to lock from editing.

- Now, make a right-click over your selected cells. After that choose the command “Format Cells”.
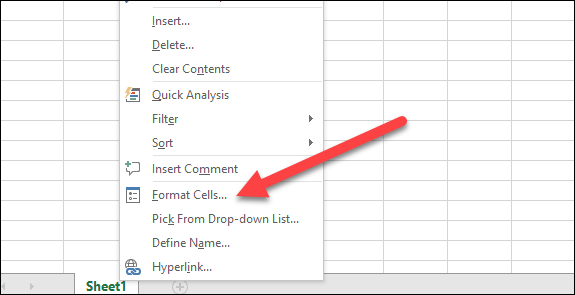
- In the Format Cells window, go to the “Protection”.

- Uncheck the checkbox present across the “Locked”.

- Hit the ok.

Helpful article: Ways to Lock Cells in Excel (Working Tutorial)
What Is The Difference Between Protect Sheet And Protect Workbook In Excel?
- Workbook-level:
With the application of this Workbook-level security you can lock the workbook structure by setting up the password. Locking up the workbook structure prevents third-party users from hiding, renaming, adding, moving the Excel worksheets.
- Worksheet-level:
Whereas with the application of worksheet level protection, you can easily keep control of other users working styles within your worksheets. As you have the option to specify what other users can do in the Excel worksheet.
Thus it assures you that none of your worksheet’s important data gets affected.
Suppose, if you want that the user will only add columns and rows or can only sort or use the auto filters. In that case, once you enable the sheet protection, you can easily protect other elements like ranges, formulas, cells, and ActiveX or Form controls.
How To Retrieve Lost Or Deleted Excel Workbook Data?
Following the above-given tricks, you can easily protect Excel workbooks from editing. But if due to misdeeds of any other user you get stuck into worksheet corruption, deletion, or missing-like situations.
In that case, also you have the option left, so don’t get worried…! It is recommended to try the Excel Repair Tool for easy repair and recovery of corrupted, damaged, and inaccessible data from the Excel workbook. This tool is well capable of fixing different errors and issues related to the Excel workbook and recovering deleted Excel data.
With this unique tool, you can restore entire data including the charts, worksheet properties cell comments, and other data without doing any modification. It is easy to use and supports all Excel versions.
So, try the given solutions to recover corrupted Excel workbook data.
Related FAQs:
How Do I Limit Who Can Edit an Excel Spreadsheet?
To limit who can edit an Excel sheet that you have shared, follow these steps:
- Go to the File > Info.
- Choose the Protect Workbook, point to Restrict Permission by People >> select Restricted Access.
- Under the Permissions dialog box, choose Restrict permission to this workbook, and then allow the access levels you want for each user.
Why Can't I Password Protect an Excel File?
It might be possible that the workbook is already password-protected or it may be due to incorrect settings in your workbook.
What Is the Shortcut for Password Protection in Excel?
ALT + R + PW is the shortcut for password protection in Excel.
How Do You Protect a Workbook in Excel but Allow Read Only?
To protect a workbook in Excel but allow read-only mode, follow the below instructions carefully:
- Open the Excel workbook you need to protect.
- Go to File menu >> click Passwords.
- Under the File Passwords dialog box, choose the Read-only suggested check box >> click OK.
- Close the workbook.
What Are the Three Types of Protection in Excel?
The three types of protection in MS Excel are:
- Workbook Protection.
- Worksheet Protection.
- Cell Locking.
Bottom Line
Protecting your Excel sheets from editing is crucial for maintaining data accuracy & security. However, by using the methods specified in this blog, you can protect Excel workbook from editing and ensure it remains intact. Choose the technique that best suits your needs and enjoy worry-free data management!
Furthermore, you can also visit our Repair MS Excel social account on Facebook and Twitter pages.

Priyanka Sahu
Priyanka is a content marketing expert. She writes tech blogs and has expertise in MS Office, Excel, and other tech subjects. Her distinctive art of presenting tech information in the easy-to-understand language is very impressive. When not writing, she loves unplanned travels.