Sharing workbooks in MS Excel can improve collaboration among team members. But sometimes, the “Unshare Workbook” option may be greyed out, leaving you unable to revert your workbook to a private document. In such a situation, it is important to solve this problem ASAP. In this blog, I will explore why is the unshare workbook greyed out in Excel and how to troubleshoot it to regain control of your shared Excel files.
To fix corrupt Excel workbook, we recommend this tool:
This software will prevent Excel workbook data such as BI data, financial reports & other analytical information from corruption and data loss. With this software you can rebuild corrupt Excel files and restore every single visual representation & dataset to its original, intact state in 3 easy steps:
- Try Excel File Repair Tool rated Excellent by Softpedia, Softonic & CNET.
- Select the corrupt Excel file (XLS, XLSX) & click Repair to initiate the repair process.
- Preview the repaired files and click Save File to save the files at desired location.
Why Is My Excel Unshare Workbook Greyed Out?
The unshare workbook is greyed out or inactive due to several reasons, including:
- The workbook is in compatibility mode.
- Excel file is corrupted or damaged.
- Using Excel tables.
- The workbook is protected with a strong password.
- When the track changes feature is enabled.
- Shared workbook feature deprecation in the latest versions.
How to Fix Unshare Workbook Greyed Out in Excel?
To fix this issue, follow these troubleshooting methods:
Fix 1- Disable Compatibility Mode
The very first method you can try is checking and disabling the Compatibility Mode. Enabling this feature sometimes can hinder you and lead to such greyed-out problems.
Here’s how you can do so:
- On the Excel menu, simply click Preferences.
- In the Sharing and Privacy >> click Compatibility.
- Now, in the Compatibility Report, you have to clear the checkbox of “Check documents for compatibility” option >> OK.
Also Read: Fix Excel Track Changes Grayed Out Issue
Fix 2- Unprotect the Workbook
Password-protected Excel sheet is another reason for unshare workbook is greyed out problem. All you need to do is to unprotect your Excel workbook to solve it:
- Open a faulty Excel sheet >> click Review tab >> ‘Protect Workbook’ option under Protect group.
- Now, an “Unprotect Workbook” popup box will appear, enter the password >> click OK.

Fix 3- Solve Excel Unshare Workbook Greyed Out by Converting Excel Tables to Ranges
As already mentioned in the causes, instead of ranges, if tables are present in the worksheet, it can cause a greyed-out unshare option. You can tackle this situation by converting the table into a range.
To do so:
- Select the table >> click on Table Design tab.
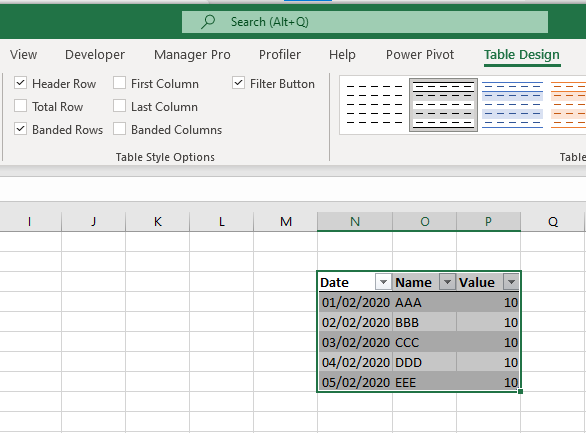
- Then, click on the Convert to Range.
- Now, confirm your choice when provoked. As soon as the table is removed, try unsharing the workbook again.
Fix 4- Use Open and Repair
If the workbook becomes corrupted or damaged, it can lead to unshare workbook greyed out 365 issues. In such a situation, you can easily repair your corrupted Excel file and fix the problem by using Excel’s built-in Open & Repair tool.
Follow the below instructions carefully:
- Open Excel >> click File > Open.
- Navigate to the folder which contains a corrupted file.
- Under an Open dialog box, select a corrupted workbook.
- After that, click the arrow next to an Open button >> Open and Repair option.
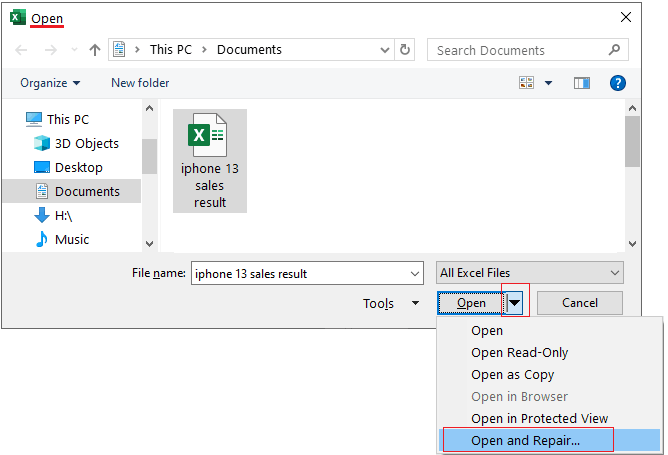
- To recover as much of the spreadsheet data as possible, click Repair.

Fix 5- Disable Track Changes
If the above solutions fail to work, then the last option left for you is to check and disable Track changes. Follow these steps to do so:
- Launch the Excel workbook >> click on the Review tab.
- Next, click on Track Changes >> choose Highlight Changes and uncheck the “Track changes while editing” check box.
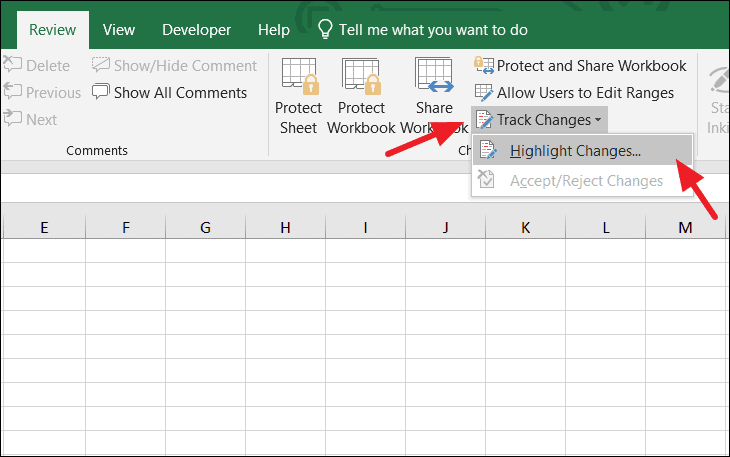
- Finally, click OK to apply the changes and make the unshare option visible.
Also Read: Unlock Grayed-Out Menus in Excel- 7 Secret Methods Revealed!
Pay Attention Here!
Meanwhile, with this sharing and unsharing Excel workbook process, the risk of Excel workbook corruption gets too high. If this situation happens with any of you then also you don’t need to worry. I am telling this because there is an easy recovery solution to get out of this problematic situation.
To fix a corrupted Excel workbook you can try using the Excel Repair Tool. It is the most recommended tool to recover/corrupted/damaged/deleted xls or xlsx file data. So you can try this recovery tool if you are stuck in such a corruption issue.
This is a unique tool to repair multiple Excel files in one repair cycle and recover the entire data in a preferred location. This tool allows easy restoration of all corrupt Excel files including the charts, worksheet properties cell comments, and other important data.
How to Unshare Workbook in Excel?
You can turn off sharing of Excel workbook by various methods.
Method 1: Enable “Unshare” From The Share Option
- In your Excel workbook click the review After then go to the Changes group and choose the share workbook icon. This will open the Share Workbook dialog box.
- You can see there is an editing tab having the following option “Allow changes by more than one user at the same time…”. You have to clear the checkbox present beside this option and then, and click OK button.

- Clicking the OK option will throw an alert, with the message “You are about to remove the file from shared use and erase the change History”.
If you agree to this statement, then click Yes, otherwise No.

Notes:
- In the “Who has this workbook open now” box, make sure only your name is listed here. If there is some other user also attached then disconnect all of them.
- If in case the checkbox is grayed out or you are unable to uncheck it. Then most probably the chances may be that your shared workbook protection is left on.
For unprotecting the Excel workbook.
- Firstly close this opened Share Workbook dialog box.
- After that tap to the Review tab and from the changes group click on the Unprotect Shared Workbook button.
- Once your protected shared worksheet gets unprotected you can easily perform the above method.
Method 2: Unshare Excel Workbook Shared Through One Drive
- Open the Excel workbook. Now load the shared document from OneDrive which you are willing to unshare.
- On the left side of your Excel application window, there is an option of Open Other Workbooks.
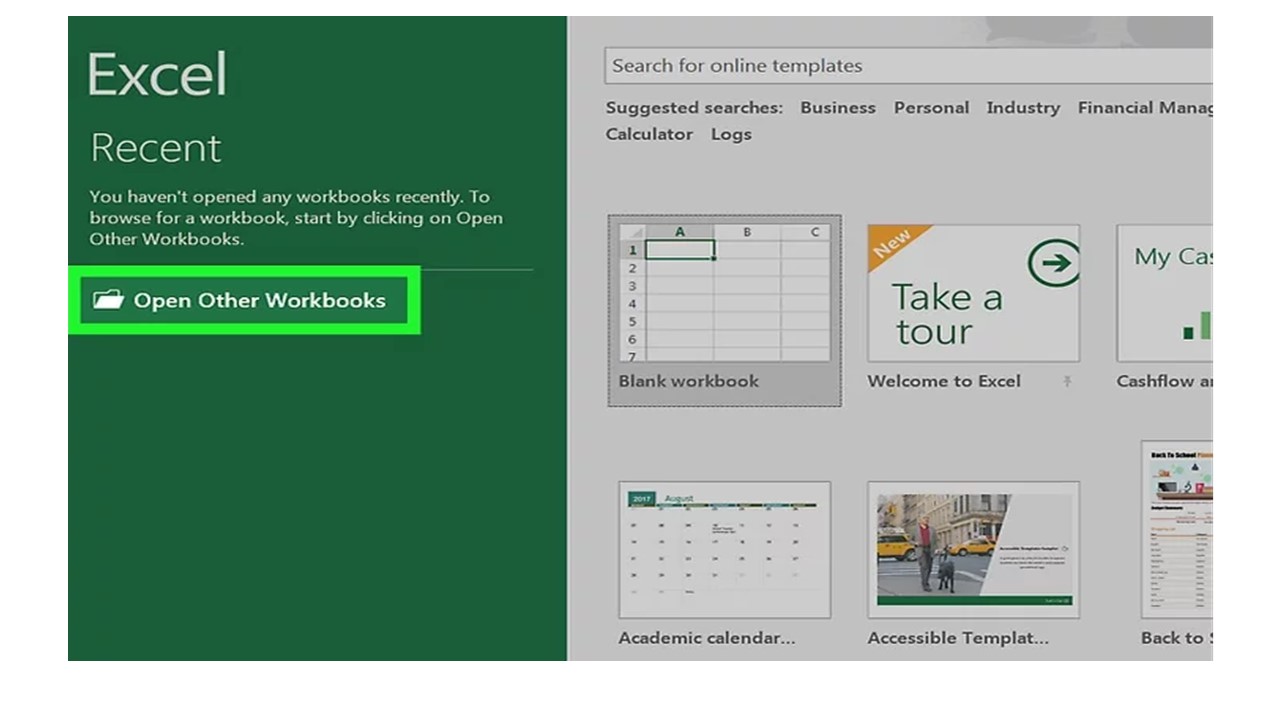
If the document is recently opened then it will surely appear on the left sidebar recent option. You just need to click over the version of the Excel document in which OneDrive is written.
- Tap to the OneDrive option. On this page, this is the Save location.

- Tap to the document you are willing to unshare. Performing this will open your selected document in Excel.

- Now tap to the share icon which is present on the same page top right side of the Excel toolbar.

- Make a click on the shared user name. Doing this will show the drop-down menu.

- Tap to the Remove User Option. Tapping to this will remove all the selected users present in the sharing list of Excel documents.
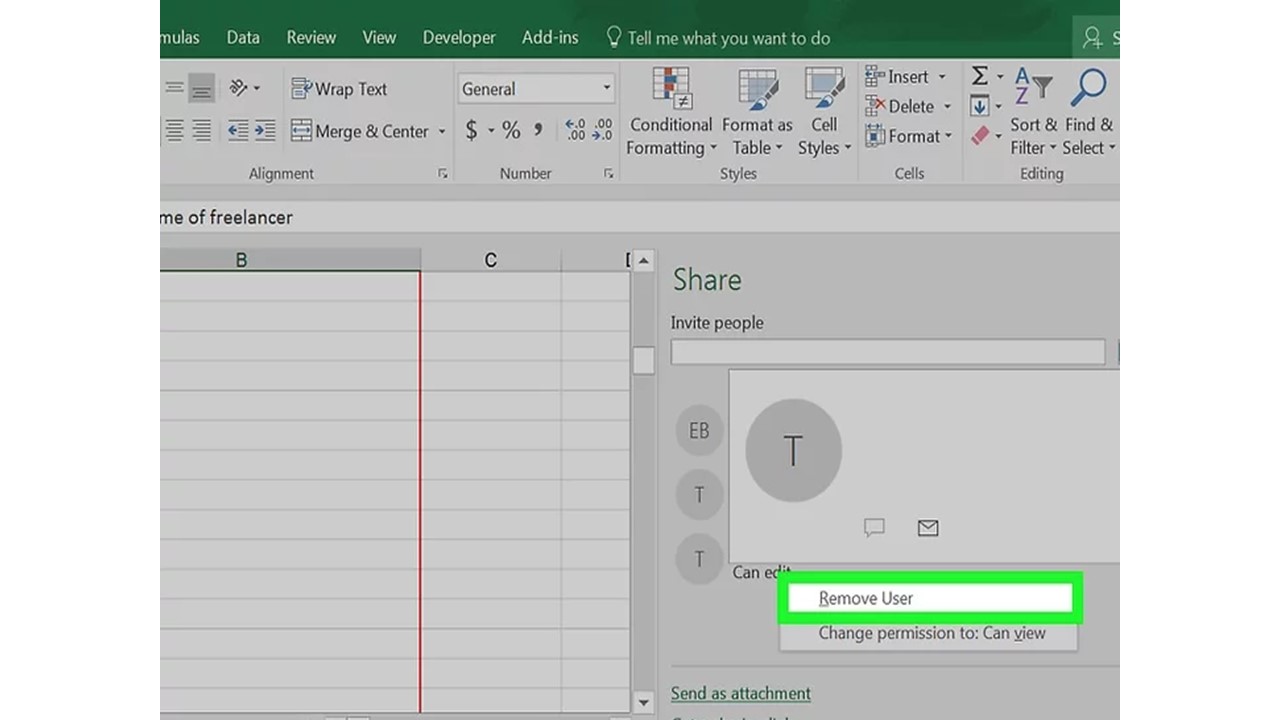
Perform the same step to remove any user from this shared list.
- From the toolbar of the Excel, window hit the review tab.

- After that go to the change group option and tap the share workbook icon.

- uncheck the option “Allow changes by more than one user at the same time” section.

- At last, click the OK option. This will completely unshare Excel workbook and also remove all the users attached for sharing the workbook.

Related FAQs:
Why Is Excel Not Allowing Me to Share My Workbook?
It might be possible that your workbook contains tables or XML maps so that it cannot be shared.
How Do I Unlock a Shared Excel Workbook?
If you want to unlock a shared Excel file, then open that workbook. Navigate to the ‘Review’ tab >> ‘Share Workbook’ under the ‘Changes’ group. Now, you have to uncheck the option ‘Allow changes by more than one user at the same time’ >> click the OK option.
How Do I Enable the Share Workbook Button in Excel?
To enable the shared workbook, click File >> Options >> Quick Access Toolbar. Open the list in Choose commands from & select ‘All Commands’. Now, scroll down until you see Share Workbook (Legacy). Click Enable.
Bottom Line
Fixing Excel unshare workbook greyed out issues involving various troubleshooting techniques. However, by going through this blog and implementing the solutions mentioned here, you can scientifically fix this issue in no time with less effort.
Furthermore, if you’ve any queries, you can ask on our Facebook & Twitter pages.
Thanks for reading!
External References:
- https://techcommunity.microsoft.com/t5/excel/unable-to-unshare-workbook-tab-is-gradout/td-p/1072042
- https://answers.microsoft.com/en-us/msoffice/forum/all/unshare-workbook-is-greyed-out-excel-2016/4a3c929d-86e9-45fc-a62d-f82ca1077abd
- https://support.microsoft.com/en-us/office/repair-a-corrupted-workbook-153a45f4-6cab-44b1-93ca-801ddcd4ea53

Priyanka Sahu
Priyanka is a content marketing expert. She writes tech blogs and has expertise in MS Office, Excel, and other tech subjects. Her distinctive art of presenting tech information in the easy-to-understand language is very impressive. When not writing, she loves unplanned travels.