In MS Excel, Autosave is an excellent feature that gives you peace of mind that your work is being constantly saved at regular intervals. This feature can be handy in case of unexpected events like – power outages, system crashes, or accidental closure of the app. Despite its several advantages, there are instances where autosave not working in Excel. In this blog, you will get to know the common reasons behind this problem and how to fix it with less effort.
To fix corrupt Excel files, we recommend this tool:
This software will prevent Excel workbook data such as BI data, financial reports & other analytical information from corruption and data loss. With this software you can rebuild corrupt Excel files and restore every single visual representation & dataset to its original, intact state in 3 easy steps:
- Try Excel File Repair Tool rated Excellent by Softpedia, Softonic & CNET.
- Select the corrupt Excel file (XLS, XLSX) & click Repair to initiate the repair process.
- Preview the repaired files and click Save File to save the files at desired location.
Quick Navigation:
- Why Is Autosave Not Working In Excel?
- How To Fix Excel Autosave Not Working Issue?
- How To Fix Excel Autosave Not Working Saved In Onedrive/SharePoint?
- How To Autosave Microsoft Excel File To Dropbox?
Why Is AutoSave Not Working on Excel?
We cannot blame a single reason for Excel autosave not working problem. In this section, I will mention the most common factors behind this issue.
- Network connectivity issues.
- Incorrect settings.
- The Autosave feature is disabled.
- Faulty add-ins.
- Using an outdated version of Excel.
- Corruption in the Excel XLSX file.
How to Fix AutoSave Not Working In Excel Issue?
If your Excel autosave feature is working, just try out the below-mentioned workarounds to fix this issue effectively.
Quick Fixes:
Method 1: Use the Best Excel Repair Software
If your AutoSave feature not working due to Excel file corruption, then by using the Excel Repair Tool you can easily repair your damaged xlsx file and recover its entire data. You can completely rely on this tool to repair severely corrupted xlsx/xls files.
Following are some highlighting features of this tool:
- Repairs corrupted or damaged Excel files without hampering the cell formatting or worksheet properties.
- Recover entire Excel file components such as chart sheets, forms, reports, tables, charts, formulas, images, cell comments, etc.
- The tool can repair multiple Excel files in one go.
- It has good support for all Excel versions including Excel 2019.
Method 2: Make Sure the AutoSave Feature Is Enabled
As already mentioned in the causes, if the AutoSave option is eventually disabled then this feature fails to work. In such a situation, consider enabling it to make it work again.
Follow the below-given steps to check and enable the AutoSave feature on Microsoft Excel application:
Step 1: First you have to open the Excel file using Microsoft Excel 2016 and then click on the File then go to the Options.

Step 2: Click on the Save tab present at the left pane, tick mark the Save AutoRecover information every * minutes and also tick mark Keep the last autosaved version if I close without saving box.

Step 3: Then, click on the Advanced tab present at the left pane and then tick mark Allow background saves box and at last click OK to save all the changes.

After this, your Excel application will start AutoSaving your data and you won’t get any autosave not working issue.
Also Read: Excel AutoRecover Not Working? Here’s How to Fix It!
Method 3: Use Other Alternative Options
If you are still unable to use the Excel AutoSave feature in order to save and backup Excel files then you have other alternative options as well i.e temp file.
If you are using the Windows 7 system then you will find the Excel Temp file at the below-given location:
C:\Users\name\AppData\Roaming\Microsoft\Excel\
If you are using the Windows 8 or 10 system then you will find the Excel Temp file at the below-given location:
C:\Users\AppData\Local\Microsoft\Office\UnsavedFiles
After finding the Excel temp file, simply resave the file with the extension .XLS/.XLSX
Method 4: Check for the Faulty Conflicting Add-ins
Sometimes, add-ins may interfere with the AutoSave. Simply disable them to get rid of Excel autosave not working:
- Open MS Excel >> click File > Options.
- Navigate to Add-ins >> select Manage: COM Add-ins.
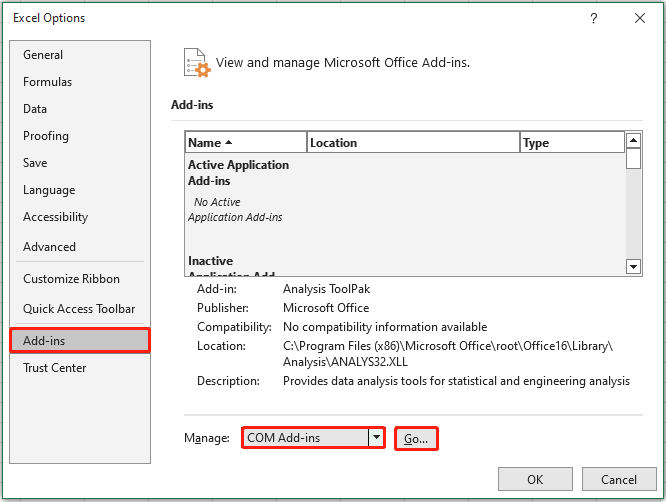
- Click Go, then uncheck any needless add-ins.
- Restart MS Excel & check if AutoSave works.
Method 5: Repair Corrupt Excel File
As we have already discussed corruption is also one of the reasons behind autosave not working in Excel.
If Excel file corruption has resulted in this Autosave stopped working issue then you have to repair your corrupt Excel file.
For this, go with the Excel inbuilt utility tool: Open and Repair. As it can repair damaged/corrupt Excel files and extract data.
Here are the steps to execute this inbuilt utility:
Step 1: First you have to open a blank Excel sheet, and then click on the File and Open.
Step 2: Click on the location and path that stores the damaged Excel file.
Step 3: From the Open dialog, choose the corrupted Excel file and click on the arrow to Open button > Click Open and Repair.
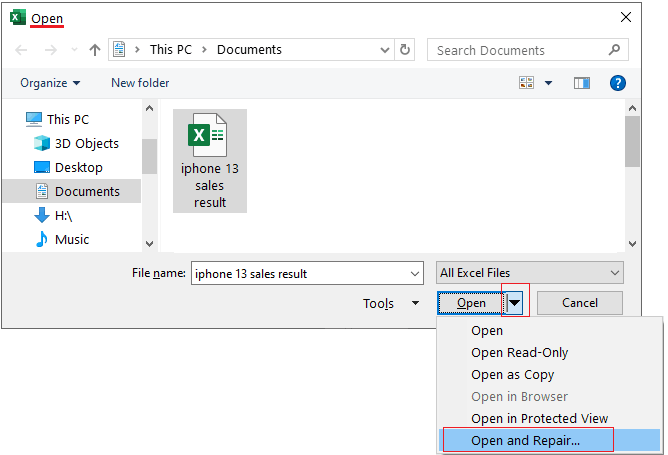
Step 4: At last, you have to click on the Repair to recover as much of your work as possible.

Method 6: Fix AutoSave Not Working in Excel by Updating Microsoft Excel
Running an outdated version of Excel software is another major factor that can cause functionality issues. You can fix this problem by updating the Excel software:
- Open Excel >> Go to File > Account.
- Next, click Update Options >> Update Now.
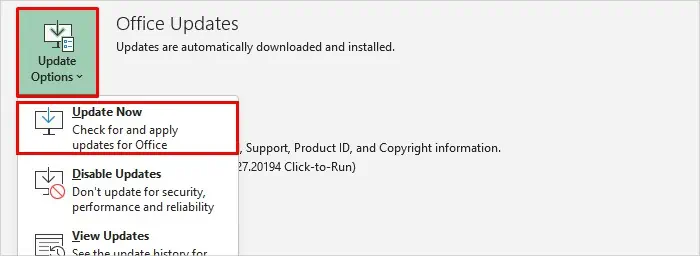
- Restart Excel after updating.
Method 7: Reinstall The Excel Application
If you are still facing this Excel AutoSave stopped working issue then try reinstalling the Excel application. As most of the time missing components meanwhile the installation can also generate such type of issues. So you can fix it by reinstalling the MS Office application.
For this, you have to uninstall the MS Office application from the control panel and then reinstall it again.
How to Fix Excel Autosave Not Working Saved In Onedrive/SharePoint?
Sometimes you may face Excel autosave not working in the file saved in OneDrive, OneDrive for Business, or SharePoint. When a user hovers the mouse pointer over the AutoSave toggle then the tooltip will appear with the following message:
AutoSave Not Available. This file location doesn't support AutoSave. Save to OneDrive or SharePoint Online if you want to use AutoSave.
This problem is fixed in Monthly Channel Version 1708 (Build 8431.2094) and higher. If you haven’t got any update then in order to get the latest update immediately follow the below-given steps:
First, open an Office app and navigate through the File > Account > Update Options > Update Now.

In case, you are still suffering from the experience or unable to update then follow the given steps:
Step 1: Open the Microsoft Office application and then click on the File > Open and navigate to the server location (OneDrive or SharePoint)
Step 2: Then, with the help of a web browser, try to open the file straight from SharePoint or OneDrive where the file is saved.
How to Autosave Microsoft Excel File To Dropbox?
Steps for the latest Excel Version
Step 1: Click on the File and then Options -> Save.
Step 2: In Outlook, click on the File > Options > Mail.
Step 3: Now, you have to confirm that the Save AutoRecover information every x minutes box is marked.
Step 4: Also confirm that Keep the last autorecovered version if I close without saving box is marked.
Steps for Microsoft Excel 2007
Step 1: Click on the Microsoft Office Button and go to the Excel Options then click Save.
Step 2: Now, you have to mark the Save AutoRecover information every x minutes check box.
Step 3: At the minute’s list, you have to specify how frequently you want the application to save your data being edited.
Step 4: Or you can also change the location where the Microsoft application automatically saves a version of files you work on.
Also Read: Solving Excel Formulas Not Calculating Automatically- 5 Pro Tips
Frequently Asked Questions:
Why Is My AutoSave Not Turning on in Excel?
It might be possible that your Excel file is itself corrupted so, you cannot turn on this feature.
How to Enable Auto Recovery in Excel?
To enable auto recovery in Excel, follow these steps:
- Navigate to File > Options > Save.
- Ensure the ‘Save AutoRecover information every x minutes’ checkbox is selected.
Why Is My Excel File Not Letting Me Save?
It might be possible that the destination doesn’t have sufficient space to save the Excel file
How to Find AutoSave in Excel?
You will have to click on the FILE tab >> choose Info. Next to the Manage Versions button, you will see all autosaved versions of your document.
What to Do When Excel Is Not Responding and You Haven't Saved?
If your Excel is not responding and you haven’t saved your work, you can follow the below steps:
- Close Excel application the reopen it.
- Then, you'll see a Document Recovery pane on the left side with a list of autosaved files.
- Choose the most recent version of your document to recover your unsaved work.
Time to Verdict
Excel's autosave feature can prevent unexpected data loss by automatically saving your work. But when this feature stops working, it can be really frustrating. However, by following the above solutions, you can easily solve AutoSave not working in Excel successfully.
For further doubts and queries, you can contact us on Facebook and Twitter.

Priyanka Sahu
Priyanka is a content marketing expert. She writes tech blogs and has expertise in MS Office, Excel, and other tech subjects. Her distinctive art of presenting tech information in the easy-to-understand language is very impressive. When not writing, she loves unplanned travels.