Sometimes, Excel users need to send a specific worksheet or cell as an email attachment to the head of the company or college. For this purpose, you must have the knowledge of sending the worksheet or cell as an Email. In this blog, you will get to know step-by-step methods on how to send only one sheet in Excel via Email. This helps keep your data organized, protects sensitive information, and ensures that the recipient gets only the relevant data.
To recover lost Excel data, we recommend this tool:
This software will prevent Excel workbook data such as BI data, financial reports & other analytical information from corruption and data loss. With this software you can rebuild corrupt Excel files and restore every single visual representation & dataset to its original, intact state in 3 easy steps:
- Try Excel File Repair Tool rated Excellent by Softpedia, Softonic & CNET.
- Select the corrupt Excel file (XLS, XLSX) & click Repair to initiate the repair process.
- Preview the repaired files and click Save File to save the files at desired location.
Can Excel Send Email Based on Cell Value?
Yes, Microsoft Excel can send you automatic emails each time the cell value changes, when the spreadsheet is updated, or when a condition is met. Thus, send an Email totally based on the cell value.
What Are The Steps To Add Send to Mail Recipient Icon?
Go through the steps below to add Send To Mail Recipient icon in your Excel:
- Click on the File menu in Excel.
- Select Options from the menu.

- Select the Quick Access Toolbar option.
- Under Choose commands from select All Commands.
- Then scroll down and choose to Send to Mail Recipient.
- To add the Send to Mail Recipient in the right pane of Customize Quick Access Toolbar: click on Add.

- Click on the Ok button.

You will find the Send to Mail Recipient icon on the top left side of Excel. Now go for the different ways on how to send only one sheet in Excel via Email.
How to Send Only One Sheet In Excel Via Email?
1# Send Specific Worksheet As Email Attachment
It’s not possible to attach a single worksheet in Email, as it can only attach files to send through Emails.
If you want to send the specific worksheet through Email then you have to first create a workbook file. So, follow the below-given steps to send specific worksheet or cell as Email attachment.
First, right-click on the particular worksheet that you want to attach to the Email.
- Click on the Move or Copy… option.

- In the Move or Copy dialogue box, select (new book) under To book: list.
- Select Create a copy checkbox.
- Then click Ok. You will see your new workbook file with a copy of your selected single worksheet.

- Now click on Send to Mail Recipient icon.

- Select send the entire workbook as an attachment.
- Click on Ok. It will attach your newly created workbook file.

- Click on the Send button.
Using these above steps you can create a new workbook file and send single excel worksheet as email attachment.
After emailing, you can delete that newly created file as already you have that specific worksheet in your original workbook.
2# Send Entire Workbook As Email Attachment
If you want to send the entire workbook with multiple sheets as an Email attachment, go for the below steps:
- First, click on Send to Mail recipient icon in Excel.
- Select send the entire workbook as an attachment in the email dialogue box.
- Click Ok. It will attach your entire workbook file in an Email dialogue box.

- Click on the Send button.
The above steps will attach your entire workbook in Email.
3# Save as PDF and Email
Most of the time, the recipient doesn’t need an editable file, in such a case, sending a file in PDF is a great option. To do so, follow the below steps:
- Open your Excel sheet.
- Navigate to File > Save As.
- Select PDF as the file format.

- Save a file to your chosen location.
- Attach a PDF to an email & send it.
4# Send Excel Worksheet Using VBA Code
If you send Excel worksheets on a regular basis, then you can use below mentioned VBA code. Follow the below steps to send specific worksheet or cell as Email attachment using VBA code:
- First, open the workbook from which you want to select the range of cells.
- To open Microsoft Visual Basic, press and hold ALT + F11 keys.
- Click on Insert.
- Select Module.

- You will find space for code in the Module window. Copy the below-given code and paste it into the Module window.
Option Explicit
Sub EmailandSaveCellValue()
‘Variable declaration
Dim oApp As Object, _
oMail As Object, _
WB As Workbook, _
FileName As String, MailSub As String, MailTxt As String
‘************************************************* ********
‘Set email details; Comment out if not required
Const MailTo = “some1@someone.com”
Const MailCC = “some2@someone.com”
Const MailBCC = “some3@someone.com”
MailSub = “Please review ” & Range(“Subject”)
MailTxt = “I have attached ” & Range(“Subject”)
‘************************************************* ********
‘Turns off screen updating
Application.ScreenUpdating = False
‘Makes a copy of the active sheet and save it to
‘a temporary file
ActiveSheet.Copy
Set WB = ActiveWorkbook
FileName = Range(“Subject”) & ” Text.xls”
On Error Resume Next
Kill “C:\” & FileName
On Error Goto 0
WB.SaveAs FileName:=”C:\” & FileName
‘Creates and shows the outlook mail item
Set oApp = CreateObject(“Outlook.Application”)
Set oMail = oApp.CreateItem(0)
With oMail
.To = MailTo
.Cc = MailCC
.Bcc = MailBCC
.Subject = MailSub
.Body = MailTxt
.Attachments.Add WB.FullName
.Display
End With
‘Deletes the temporary file
WB.ChangeFileAccess Mode:=xlReadOnly
Kill WB.FullName
WB.Close SaveChanges:=False
‘Restores screen updating and release Outlook
Application.ScreenUpdating = True
Set oMail = Nothing
Set oApp = Nothing
End Sub
NOTE: You can modify this code by changing some of the lines as per your information.
- Press Alt + Q key to close VBE.
- Then click on EmailandSaveCellValue/Tools/Macros to execute the code.
How to Email Selected Cells in Excel?
In this case, you can send the range of cells from the Excel worksheet using several ways that are mentioned below.
By using these methods, you can easily select the cells and send them as an Email attachment.
1# Send Range Of Cell As Email Message Body
In this case, you can send a range of cells through Email. If you want to send only the part of your worksheet then go for the below steps:
- Click on Send to Mail recipient icon.
- In the Email dialogue box, select Send the current sheet as the message body option.
- Click on the Ok button.

- You will find the current worksheet in the Email body. Then select the range of cells from the Email message body.
- In the Email dialogue box, enter recipient and subject.
- Click on Send this Selection.
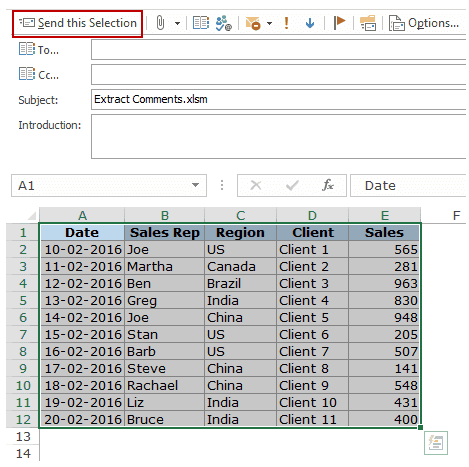
- Click on the Send button.
2# Send Range Of Cell Using VBA Code
You can also send a range of cells from the worksheet using VBA Code as an Outlook Email attachment. So, go through the below steps:
- First, open the Excel workbook from which you want to send the range of cells as Email.
- To open Excel VBA Editor, press the Alt + F11 key.
- Then in Excel VBA Editor, click on Insert.
- Select Module option.
- Now turn on your Microsoft Outlook Object.

- Click on the Tools tab.
- Select References… from the context menu.
- In the Reference-VBA project dialogue box, search for Microsoft Outlook Object Library and select its checkbox.
- Now copy the below-given code and paste it into Module Window.
Sub SendSelectedCells_inOutlookEmail()Dim objSelection As Excel.RangeDim objTempWorkbook As Excel.WorkbookDim objTempWorksheet As Excel.WorksheetDim strTempHTMLFile As StringDim objTempHTMLFile As ObjectDim objFileSystem As ObjectDim objTextStream As ObjectDim objOutlookApp As Outlook.ApplicationDim objNewEmail As Outlook.MailItem
‘Copy the selectionSet objSelection = SelectionSelection.Copy
‘Paste the copied selected ranges into a temp worksheetSet objTempWorkbook = Excel.Application.Workbooks.Add(1)Set objTempWorksheet = objTempWorkbook.Sheets(1)
‘Keep the values, column widths and formats in pastingWith objTempWorksheet.Cells(1)
.PasteSpecialxlPasteValues
.PasteSpecialxlPasteColumnWidths
.PasteSpecialxlPasteFormats
End With’Save the temp worksheet as a HTML fileSet objFileSystem = CreateObject(“Scripting.FileSystemObject”)strTempHTMLFile = objFileSystem.GetSpecialFolder(2).Path &”\Temp for Excel” & Format(Now, “YYYY-MM-DD hh-mm-ss”) & “.htm”Set objTempHTMLFile = objTempWorkbook.PublishObjects.Add(xlSourceRange, strTempHTMLFile, objTempWorksheet.Name, objTempWorksheet.UsedRange.Address)objTempHTMLFile.Publish (True)
‘Create a new emailSet objOutlookApp = CreateObject(“Outlook.Application”)Set objNewEmail = objOutlookApp.CreateItem(olMailItem)
‘Read the HTML file data and insert into the email bodySet objTextStream = objFileSystem.OpenTextFile(strTempHTMLFile)objNewEmail.HTMLBody = objTextStream.ReadAllobjNewEmail.Display’You can specify the new email recipients, subjects here using the following lines:’objNewEmail.To = jyotismith@excel.com’objNewEmail.Subject = “Excel Repair Products”‘objNewEmail.Send –> directly send out this emailobjTextStream.CloseobjTempWorkbook.Close (False)objFileSystem.DeleteFile (strTempHTMLFile)End Sub
NOTE: You can modify this code by changing some of the lines as per your information.

- Save the code and select the cells you want to send.
- Go to new macro.
- Click on the F5 key.
- You will find an email displaying your selected cells.

3# Copy And Paste Cells
You can manually copy and paste the range of cells from your worksheet as an Outlook Email. Go through the steps below to send cells through Outlook Email:
- Open the Workbook file and select the cells from the specific worksheet.
- Copy the cells by pressing Ctrl + C key.
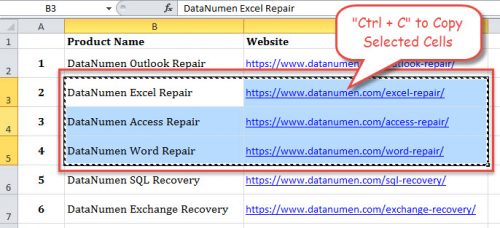
- Open your Outlook app.
- In Outlook, click on the Home tab.
- Select New message.
- Then click on the email body section.
- Now press Ctrl + V key. It will paste your copied selected cells.
- Enter recipient and subject and click on the Send button.
The above steps will send the selected cells of a worksheet to the recipient.
Also Read: Unable to Save Excel File to Shared Network Drives!
How to Attach Excel Files to Email?
Instead of sending specific or multiple worksheets, if you want to send the Excel files through Email then go below steps:
- Click on Attach button in the Email and locate the file you want to send.
- To locate the file in Windows 10:
Go to Quick Access then scroll down, and you will find your recent files.

- To locate the file in Mac:
Go to All My Files and click on Date modified, you will find the recent files in the column.

- Copy and paste the file path.
- Click on the File menu in Excel.
- Select the Info option from the menu.
(Excel 2013 and Excel 2016)
- Left-click on the file path and select Copy link to clipboard. (Excel 2010)
- Press Ctrl + C key to copy the file path.

- Paste the copied file path to File Name: in an email attachment.
- Click on the Insert button.
In this way, you can attach your Excel files and send them through Email.
Related FAQs:
Can I Email Just One Sheet of An Excel Workbook?
Yes, you can email just one sheet of an Excel workbook by following these steps:
- Right-click on a tab of your worksheet to email.
- For sending more than one worksheet, you have to hold down CTRL key & click.
- In this workbook, simply click on File, Share, Email, select Send as Attachment.
How Do I Send Only One Sheet in Excel to WhatsApp?
Since you want to send a single sheet in Excel to WhatsApp, you need to follow the below steps:
- Install rocketsend.io extension and add to Chrome.
- Go to WhatsApp Web
- Now, create an Excel worksheet with columns for names, phone numbers, and country codes
- Then, save your file as a CSV
- In a rocketsend.io pane, you have to click on Upload CSV
- Choose the CSV file you created
- After this, map the phone numbers to a field in the file
- Finally, click on Send WhatsApp.
How to Create a Link to A Specific Sheet in Excel?
If you want to create a link to a specific sheet in Excel, open worksheet, select cell(s) where you need to create a link. On an Insert tab, choose Hyperlink & type the text you want to use to represent the link.
Final Thoughts
Sending only one sheet from an Excel file is simple and effective. Whether using manual ways or VBA, these practices help you solve how to share only specific sheet/single tab in Excel spreadsheet and streamline your workflow. Choose the method that best suits your needs and keep your data secure and organized.
I hope you enjoyed reading this post!

Priyanka Sahu
Priyanka is a content marketing expert. She writes tech blogs and has expertise in MS Office, Excel, and other tech subjects. Her distinctive art of presenting tech information in the easy-to-understand language is very impressive. When not writing, she loves unplanned travels.