Sharing Microsoft Excel files allows real-time collaboration. It decreases the need for endless email attachments. However, teams can work faster & smarter together. It also ensures everyone accesses the most updated version. In this blog, you will learn how to share Excel workbook with multiple users using different ways. Apart from that, you will also get to know how to control user access to a shared Excel file and fix conflicting changes.
To repair corrupted Excel file data, we recommend this tool:
This software will prevent Excel workbook data such as BI data, financial reports & other analytical information from corruption and data loss. With this software you can rebuild corrupt Excel files and restore every single visual representation & dataset to its original, intact state in 3 easy steps:
- Try Excel File Repair Tool rated Excellent by Softpedia, Softonic & CNET.
- Select the corrupt Excel file (XLS, XLSX) & click Repair to initiate the repair process.
- Preview the repaired files and click Save File to save the files at desired location.
How to Share Excel Workbook With Multiple Users?
Here is a complete step to set permissions for a shared Excel file. So that multiple users can work together on the Excel file simultaneously.
How To Share Your Workbook?
- Choose the Share option.
- Set permissions.
- Allow editing is automatically checked. If you untick this option, then users can only view the file, but they can’t edit it.
- Choose Apply option.

- Assign the email address and name of the users with whom you want to share your Excel file.
- You can add a message if you want to give it to your Excel users.
- Hit the Send button. OR alternatively, you can choose the Copy link to get the file link.
Co-author a workbook
Here is the setting permission for shared Excel file which you must apply to work with your Excel file simultaneously.
- For a better experience, work together in Excel for the web and watch the real-time changes.
- Within Share option, you will see the user’s name who is currently editing your file.
- The colored cell indicates how many users are currently active in your Excel workbook. Tap on the color to see who is editing that cell.
Allow Specific Users To Edit Ranges In A Protected Spreadsheet
Excel gives you the option to assign user-level privileges to a different section of a password-protected worksheet.
You can assign any specific user for editing a particular range while the Excel spreadsheet is password protected.
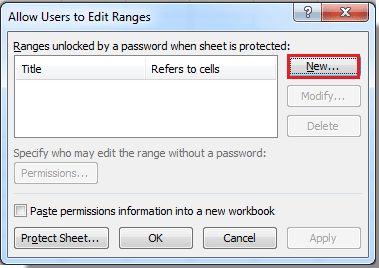
1. Hit the Review tab and then from the Changes group choose the Allow Users to Edit Ranges.

Note: This Allow Users to Edit Ranges command will appear only when the Excel workbook is not password protected.
2. Now you can perform any of the three options:
- In order to modify the already existing editable range, you need to choose the “Ranges unlocked by a password when sheet is protected” box. After then hit the “Modify” option.
- For deleting up the editable ranges choose the Ranges unlocked by a password when sheet is protected box. After that hit the Delete button.

- In case, if you need to add a new editable range then follow these steps:
3. Hit the New option to open the New range dialog box:
4. Within the Title box, you have to type the range name which you need to unlock.

5. Now in the box of Refers to cells you have to put an equal sign (=), and after that type the range reference which you have to unlock.
You can make a tap on the Collapse Dialog button, so make a selection for the range in your Excel spreadsheet. After that, hit the Collapse Dialog button once again to get back in the dialog box.
6. Within the Range password box, you have to enter the password, which works as a key to access that particular range. Well, this password is completely optional. But if you don’t assign the password, then any other user can easily edit your worksheet cells.
7. Hit the Permissions button. This will open the permission for range dialog box:
8. Add those users to whom you want to assign this edit the ranges or remove permission. And then tap on the Ok
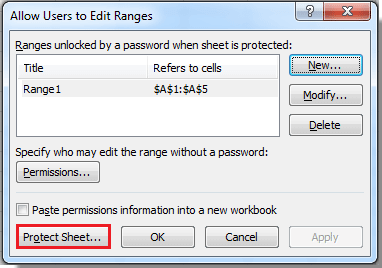
9. After making all the changes, within the dialog box of Allow Users to Edit Ranges. Hit the Protect Sheet… option for opening up the dialog box of Protect Sheet:
10. From the section of Allow all users of this worksheet, choose the items to assign to your users to make any changes in it.
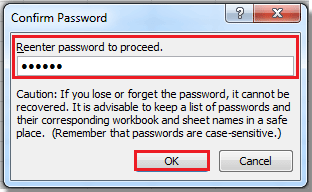
11. Now in the Password to unprotect sheet box, enter the password for the Excel sheet and tap the OK button. Retype the password for the confirmation.
Can An Excel File Be Edited By Multiple Users?
In the past, when you needed to share an Excel workbook with another user. You should send it as an email attachment or just save the Excel data to PDF format for printing.
While convenient and fast, a former method created multiple versions of the same document, and later on produced through non-editable copy. A recent version of the Excel 2010/ 2013/ 2016/2019 file is quite easy to share and collaborate on the workbooks.
By sharing the Excel file, you can give other users access to the same document and allow editing simultaneously.
This saves you from the trouble of keeping track of multiple versions.
What Are Limitation Of Shared Excel Workbook?
Before sharing an Excel workbook, it’s important to have knowledge about the limitations that the shared workbook doesn’t support.
So have a look over it…!
- Sorting and filtering by format
- Conditional formatting
- Merging cells
- Excel tables and PivotTable reports
- Charts and pictures
- Data validation
- Worksheet protection
- Grouping or outlining data
- Subtotals
- Slicers and sparklines
- Hyperlinks
- Array formulas
- Macros
- A few more things
Actually, you can use the existing excel features but you are not allowed to add or modify them. So, if you like to use any of the above-listed options then apply them before sharing up the Excel files.
How To Fix Conflicting Changes In A Shared Excel File?
- When more than two users simultaneously start editing the same Excel workbook then it may affect the data of that particular cell.
- In that case, Excel will only save the changes of the user who has saved the workbook first.
- Whereas the other user will receive a pop-up message of “Resolve Conflicts”. This dialog box contains the detail about conflicting changes.
- You can perform the following procedures to fix the conflicting changes:

- To save up your made changes, tap the Accept Mine button.
- Save the changes of some other user hit the Accept Other button.
- To keep the entire changes done by you just click the Accept All Mine button.
- Save all entire changes made by others, just click the Accept All Others.
Tip.
To save up a copy of the shared workbook along with the changes, hit the Cancel button within the dialog box of “Resolve Conflicts”.
After that save your excel workbook with a new name. Later on, you can also merge all the changes made by multiple users.
How To Force Recent Changes To Override Previous Changes Automatically?
To get the latest changes automatically by overriding all the previous changes done by any other user, without getting any “Resolve Conflicts “dialog box. In that case, you need to perform the following operation.
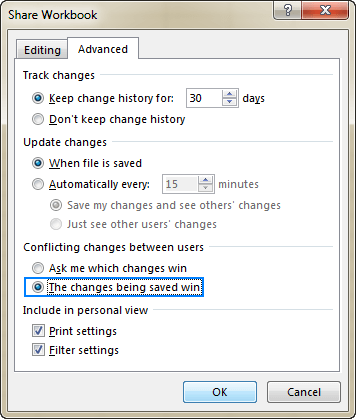
- Go to the Review tab and then from the Changes group, hit the Share Workbook option.

- On the opened window of share, workbook hit the “Advanced” Choose the option “changes being saved win” which is present under Conflict changes between users. Hit the OK button.
To see the entire changes you have made to the shared workbook. Just use the Track Changes option present within the Changes group of the Review tab.
With this, you can easily extract details like what and who have made the changes.
Related FAQs:
Can Multiple People Work on the Same Excel Workbook?
The answer is yes, multiple people can use the co-authoring to simultaneously edit an Excel workbook.
How Do I Turn on Co-Authoring in Excel?
To enable co-authoring in MS Excel, follow the below steps:
- Select Share.
- Then, upload your .xlsx/xls file to OneDrive, if you have not already.
- After this, set permissions & select Apply.
- Now, add the names of whom to share with, and an optional message.
- Choose Send option.
- Select the initials in an upper right to see who else is working on the file and where they are in the file.
What Is the Difference Between Co-Authoring and Shared Workbook in Excel?
In MS Excel, Co-Authoring means that numerous users in your organization can easily open a workbook without finding it locked because someone else was using it. Whereas a shared workbook is a file that you will find locked and cannot access it without granting permission.
Summing Up:
So, this is all about how to share Excel workbook with multiple users.
Applying passwords in the shared workbook is optional. But if you don’t assign any password, then the third person can easily unprotect your Excel sheet and make modifications to the protected Excel items.
Ensure that you have selected a password that is quite easy to remember.
If, unfortunately, you lose the password, you can’t be able to access to protected element in the spreadsheet.

Priyanka Sahu
Priyanka is a content marketing expert. She writes tech blogs and has expertise in MS Office, Excel, and other tech subjects. Her distinctive art of presenting tech information in the easy-to-understand language is very impressive. When not writing, she loves unplanned travels.