Undoubtedly, MS Excel can easily import & export numerous file types apart from the .xls & .xslx formats. But still many users are unaware to do so. Consequently, today in this helpful tutorial, we will discuss every aspect of how to export data to Excel. Also, you will learn how to import data to excel effortlessly.
So, just go through this post without skipping a single stanza.
Quick Navigation:
How To Export Data To Excel?
Take a quick glance over the different ways we are going to discuss for exporting Data To Excel.
How To Export Access Data to Excel Using Export Wizard?
Here we will consider exporting Access data to Excel using the Export wizard.
Steps To Export Access Data To Excel Using Export Wizard
- First of all, close the previously opened Excel workbook before starting the exportation process.
- Now, go to the navigation pane of your source Access database and make a selection of the object you need to export.
- Tap the External Data tab and then go to the export group. From this group hit the Excel icon.
- After that, you will see that on your screen, a dialog box of Export – Excel Spreadsheet appears opened. Assign file name for your Excel workbook. Generally, Access makes use of the source object name. If you are willing to modify it then you are free to do so.
- Now in the box of File Format, choose file format which you need.
- Suppose you are approaching to export query or table. Besides that, if you are willing to export the formatted data then choose the option Export data with formatting and layout.
Note: at the time of exporting the report or form, this option of Export data with formatting and layout seems unavailable or dimmed to you.
- If you want that your destination Excel worksheet will open automatically after the exportation process. Just put a check sign across the “Open the destination file after the export operation is complete”
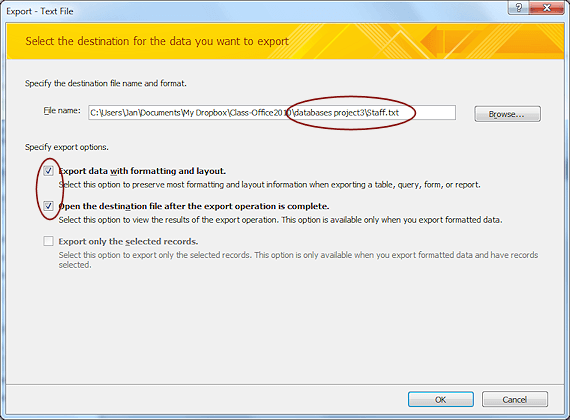
If your source objects are already open or in the view you have chosen single or multiple records before the beginning of the export procedure. Then you can choose the “Export only the selected records” option.
But for exporting the entire of your records present in the view, you need to leave the Export only the selected records checkbox empty.
Remark: Export only the selected records checkbox seems unavailable to you if no records are chosen.
- Tap on the OK option.

If unfortunately, the export data to the Excel process fails due to some error then your Access application will throw a message regarding the cause of the exportation error.
If no error is found then successful the task of exporting Access data to Excel accomplished. And automatically your destination Excel workbook after exportation gets opened on your screen.
Exporting Data To Excel From A Button

Our second method of exporting data to Excel from a button is quite fast and automated one for getting results quickly into Excel.
Note: Performing this method will remove any leading zeros because the data is exported from the result set. So, you will only get the raw data, excluding any subtotals or columns from the report.
- First of all visit the User Queries Window and now from Tools menu, make a selection for the “Design Mode” or just make a tap on the “Design Mode” button.
- Make a right-click over the Window section where you need to place the button first. Or from the shortcut menu tap to the “Create button…” option.
- After then tap on the button “Edit Text” option. Here you can assign a name for the button and can also do the formatting of the display button.
Using the left color button you can make changes in the text color whereas using the right color button you can modify the background color. After completing all these task tap on the OK option present within this opened dialog box of edit text.
- Now from the drop-down list present within the “Link to” section, make a selection for the query which you want to get run through the button.
- From the section “Output to” you need to choose the “Application” button.
- When all the above things are done then just make tap to the [OK] button present in the Create Button dialog box.
- Now it’s time to take an exit from the Design Mode. For this just go to the tool menu and select the design mode.
- For saving up your created button. You need to go to the File menu and then tap to the “Save” option.
- it’s time to check the button whether it’s working or not. So, make a tap to the created button, and you will see that it will run the query. And very soon you’re the button will automatically export data to Excel.
Also Read: 3 Ways To Import Data From MS Word To Excel
Export Report Data To Excel

Before beginning the process of exporting data to Excel, just make a check whether the Excel export settings are appropriately configured or not.
Configuring Excel Export Settings
You are allowed to choose the Excel file format on which the report will get exported. It can be either .csv or .xml. Suppose, if you are choosing .csv then you can select the character that is been used like a separator in the exported CSV files.
Here are the steps to configure the setting of Excel export:
- Select the
 icon present at the top-right corner of the page. After then choose the Settings option.

- Now from the field of Report Excel Export Format, select the appropriate Suppose you are using Excel XP or the latest versions of Excel then choose the .xml format. But if you are using an older excel version then select the .csv format.

- Suppose you have chosen the .csv Then, in that case, enter the character which must be used like a field separator within the reports which get exported to Excel. By default, the field that seems already set here is a comma (,).
- Choose the option Compress Excel Email Attachment for compressing the email attachments and send it in .zip files format. Well, it’s a very useful step for decreasing the file size of large reports.
- Tap to the Save option.
How to Export Data to Excel
In order to export data to Excel perform the following steps:
- Open the Reports whose data you are willing to export.
- At the top right corner, you will see this
 type of Excel export icon. So, tap on it.
You will see that after completion of the step, Excel file will get generated.
Also Read: How to Automate Repetitive Tasks in Excel?
How To Export SQL Data to Excel?
You can perform the task of Exporting SQL Data To Excel using the SQL Server Import and Export Wizard.
This wizard feature is offered by the SQL Server Management Studio (SSMS). Using this feature one can easily perform the task of exporting SQL data to Excel.
- Open the SSMS (SQL Server Management Studio) and get connected to your database.
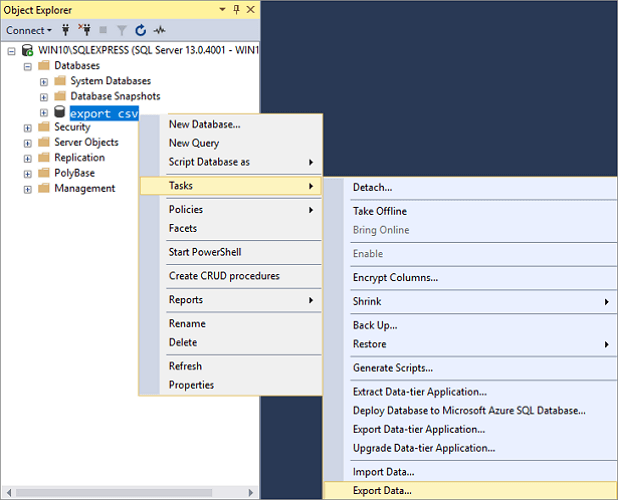
- In the object explorer, search for Server Database in which you need to export into Excel. After getting it, make a right tap on it. And then choose Tasks > Export Data for exporting the table data in SQL.
After doing this on your screen SQL Server Import and Export Wizard appears open in your screen.
- Click over the Data source drop-down button for choosing the data source which you need to copy. From this drop-down menu, you have to choose the “SQL Server Native Client 11.0” option.
Within the drop-down box of sever name choose the SQL Server instance. Whereas, in the Authentication, section choose authentication for the connection of the data source. After then from the drop-down box of Database select the database from which you need to copy the data.
When all things get done just press the “Next” option.

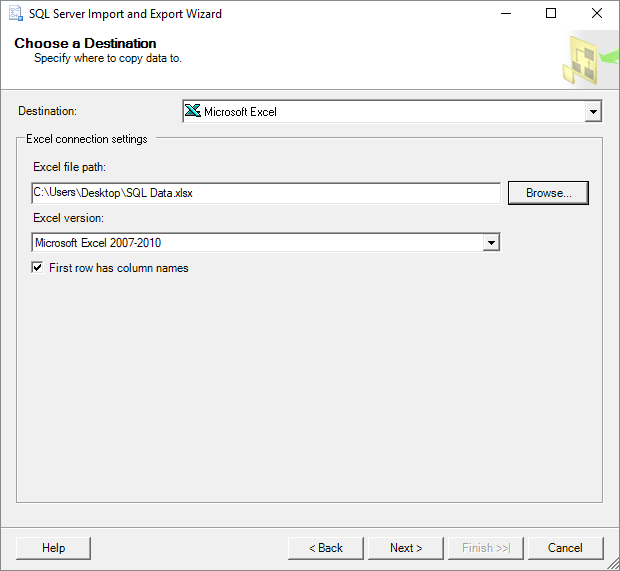
- The next window which you will get now on your screen is “Choose a Destination”. In the opened choose a Destination box, for the destination boxes, just make a selection for Excel After then assign the Excel file version and path as per your need. Filling all the data tap the “Next” button.
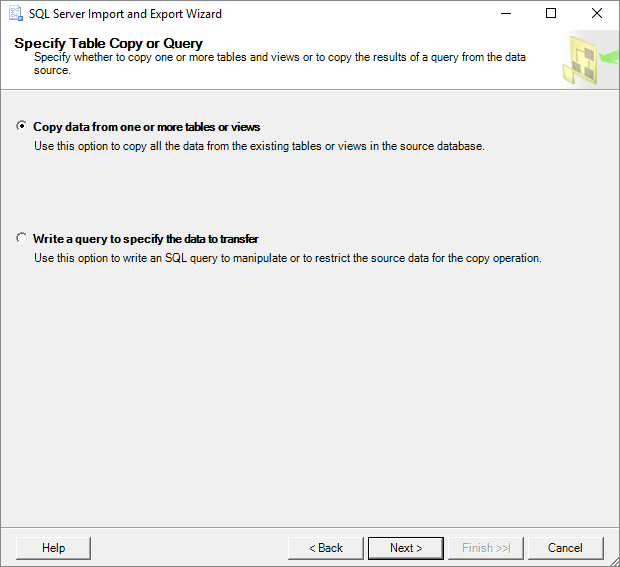
- The next opened Window is of “Specify Table Copy or Query”. Here you have to select the option “Copy data from one or more tables or views”. After then tap on the Next button.
- In the next opened Window of “Select Source Table and Views” you can make a selection for one or more views and tables from which you want to export SQL data to Excel.
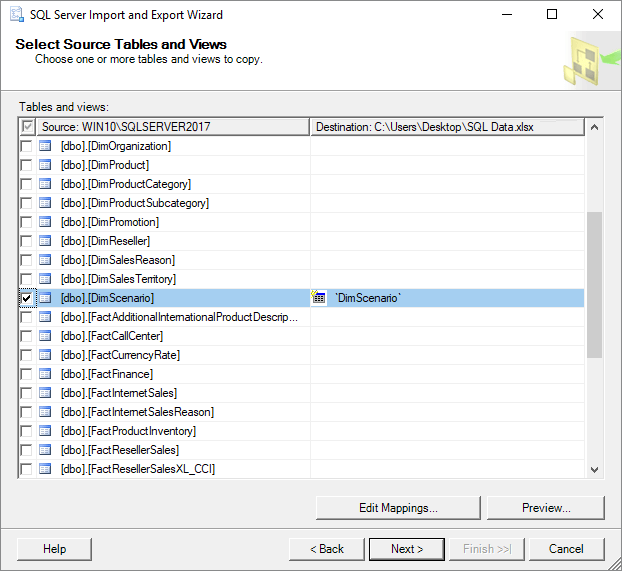
- Tap on the preview option to take an easy preview of data which will get generated to an Excel file. To move to the further step choose the next option.
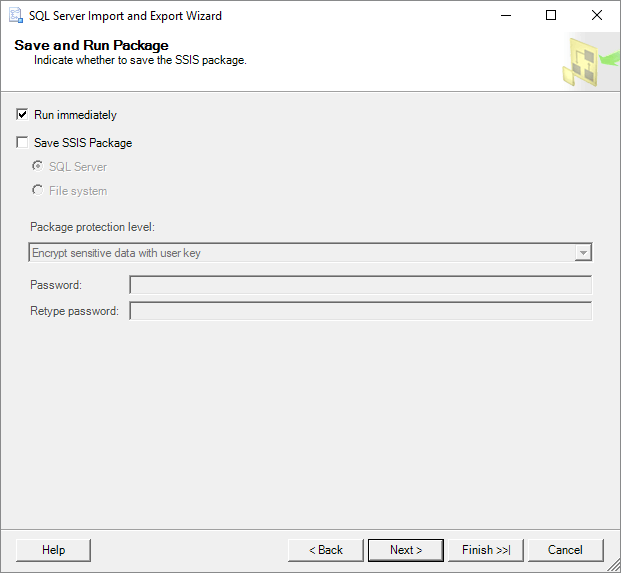
- Now on your screen, a Window of “Save and Run Package” appears. In this, you have to choose the “Run immediately” option and then press the “Next” button.
- The next Window that appears now is “Complete the Wizard”. In this Window, you can take a quick recap over the step you have performed till now. If you find everything all OK then press the Finish Tapping to this will start the Exporting Of SQL Data To Excel.

- In the next Window, you can watch the exporting process. After the completion of this, tap on the drop-down button present next to “Report”.

- From the drop-down, you have to choose “save report to file…”(with notepad or Excel) for saving up the report. Out of this notepad and Excel, you have to choose Excel for the target file.

Also Read: 4 Ways To Import Excel Contacts To iPhone
How to Import Data to Excel?
Import Data from Access to Excel
As we all know, Microsoft Access is the chief platform to store important data safely.
But what if you want to import data from Access to Excel? Well, there is nothing to worry about, we can import data straight from Access File to Excel by following the below steps:
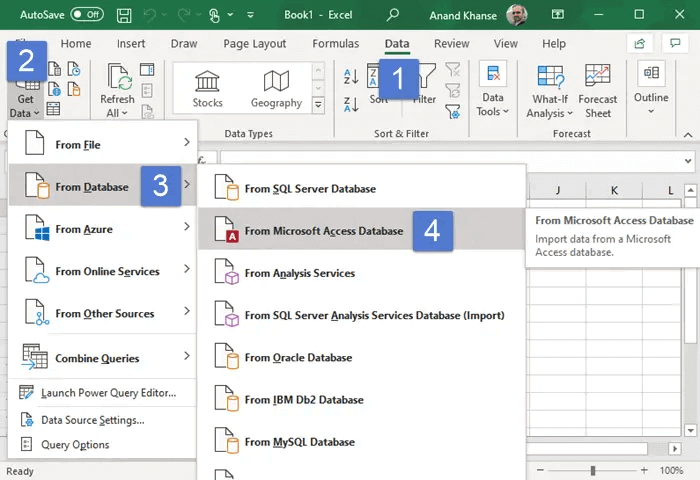
- Open Excel >> go to a “DATA” option in the top ribbon >> select Get Data >> From database >> “From Microsoft Access Database.”
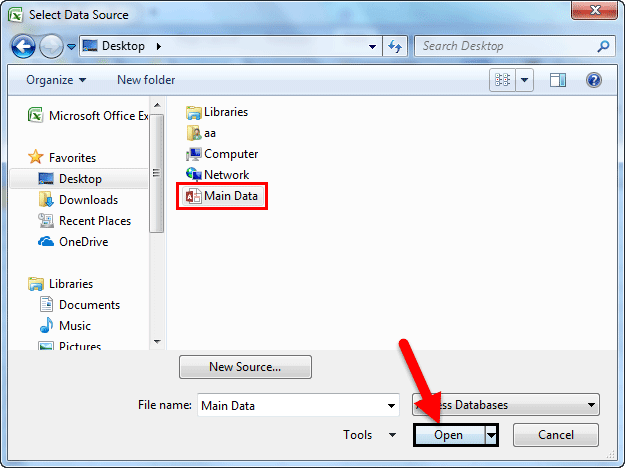
- Then, it’ll ask to locate a desired file. Choose the file path >> click “Open.”
- After this, it’ll ask you to choose the wanted destination cell where to import your data >> click “OK.”
- Finally, it’ll import your data from Access to Excel.
Import Data from Text File to MS Excel
In this section, we will show you how to import text file into Excel. let’s follow the below steps:
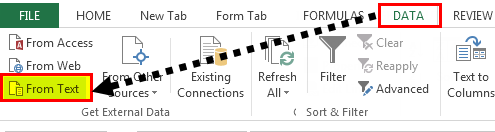
- Open Excel >> go to a “DATA” option >> click on the “From Text.”
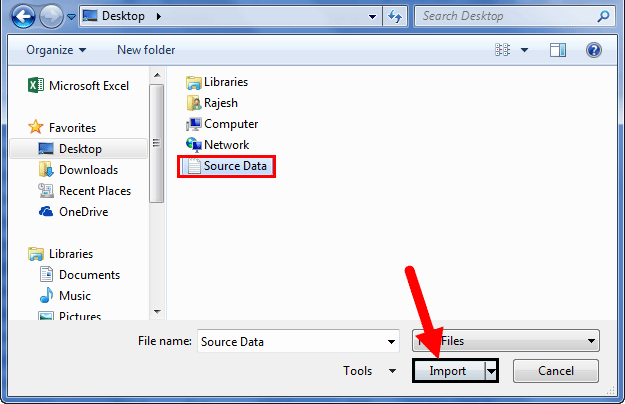
- After this, it’ll ask to choose the wanted destination where you need to import your data >> then click the “Import.”
- Now, it’ll open the “Text Import Wizard.”
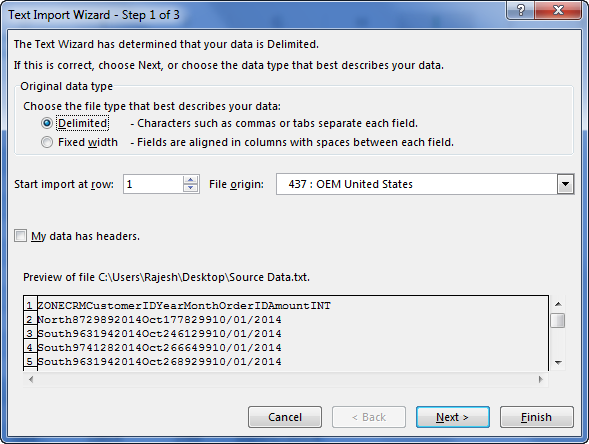
- Then, choose the “Delimited,” >> tap “Next.”
- Next, choose the other & mention comma (,) as, in a text file, each column will be separated by comma (,).
- Click “Next.” >> “Finish.”
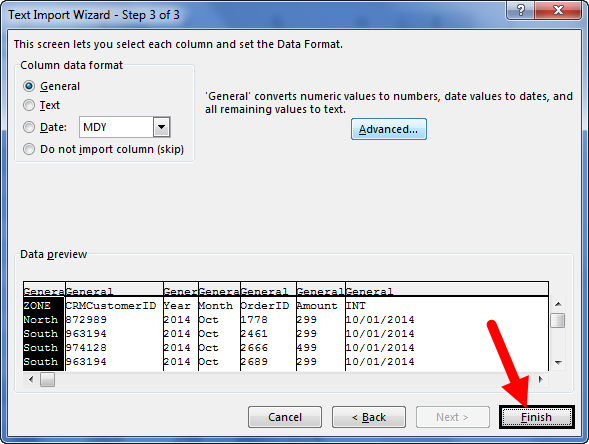
- After that, it will ask you to choose the wanted destination cell where to import your data >> click “OK.”
- Lastly, it’ll import your data from text file to MS Excel.
Related FAQs:
How Do I Transfer Data into Excel?
To transfer data into Excel, follow the below steps:
- Open the Excel sheet >> click Data tab.
- Click Get Data button.
- Choose From File.
- Choose From Text/CSV.
- Select a file you need to import >> click Import.
- Verify the preview looks correct.
- Finally, click on Load.
Which Shortcut Is Used to Export Data in Excel?
The shortcut Alt + F + E is used to export data in MS Excel.
Where Is Export in Excel?
Go to the File menu > click on Export > Save Project as File.
How Do I Automatically Export Data from One Excel Spreadsheet to Another?
You can automatically export data from one Excel spreadsheet to another by following the below steps:
- Select the workbook with the source data.
- Select whether you need to process a data before transferring it.
- Choose where you need to send the data.
- Now, click ‘Automate’ option to schedule automatic updates for this connection.
Bottom Line
Exporting data to Microsoft Excel doesn’t have to be complicated. With the right steps and proper instructions, you can move data quickly, easily, and accurately. It’s a simple process that makes data work for you.
I hope you liked this post!

Priyanka Sahu
Priyanka is a content marketing expert. She writes tech blogs and has expertise in MS Office, Excel, and other tech subjects. Her distinctive art of presenting tech information in the easy-to-understand language is very impressive. When not writing, she loves unplanned travels.