If you have ever encountered the error message “Excel cannot shift nonblank cells off of the worksheet,” you know how annoying it can be. This warning typically pops up when you try to add new rows or columns into your Excel spreadsheet, but Excel finds data that prevents it from doing so. Well, in this optimized post, I will discuss the common causes behind this error and explore effective methods to fix it in no time.
Here is the complete declaration of the error message along with the screenshot:
To prevent possible loss of data, Excel cannot shift nonblank cells off of the worksheet. Select another location in which to insert new cells, or delete data from the end of your worksheet.

To fix corrupt Excel file, we recommend this tool:
This software will prevent Excel workbook data such as BI data, financial reports & other analytical information from corruption and data loss. With this software you can rebuild corrupt Excel files and restore every single visual representation & dataset to its original, intact state in 3 easy steps:
- Try Excel File Repair Tool rated Excellent by Softpedia, Softonic & CNET.
- Select the corrupt Excel file (XLS, XLSX) & click Repair to initiate the repair process.
- Preview the repaired files and click Save File to save the files at desired location.
Why Excel Cannot Shift Nonblank Cells of The Worksheet Error Occurs?
Various reasons can contribute to this message including:
- Merged cells within the spreadsheet hindering the insertion of new rows/columns.
- Hidden rows or columns containing data, formulas, or formatting.
- Data extends beyond the currently visible range, preventing Excel from shifting cells.
As you have identified the reason, let’s move to the next section to learn the best fixes.
How to Fix Excel Cannot Shift Nonblank Cells Off of the Worksheet Error?
To fix the error message “to prevent possible loss of data Excel cannot shift nonblank cells of the worksheet” here I have listed both the automatic and manual solutions.
Solution 1- Repair The Corrupt Excel Worksheet
Most of the time it is seen that Excel stops working when a corruption issue is encountered so this can be the reason behind this error.
Try the professionally recommended Excel Recovery Tool to resolve any type of corruption problem, this is a highly advanced tool that just by scanning once detects and fixes Excel errors and recovers data stored in it. This unique tool is capable of restoring entire data including the charts, worksheet properties cell comments, and other data without doing any modification. It is easy to use and supports all Excel versions.
Steps to Utilize Excel Recovery Tool:


Solution 2- Remove Formatting to Fix Excel Cannot Shift Nonblank Cells Off of the Worksheet Error
To fix the error the very first solution that you must try is to clear each cell in a row or column. After that remove formatting from the remaining rows and columns.
Follow the steps to do so:
- First, in the first blank column to the right of your data click the heading cell. (Heading cell is the first cell in each column, and shows which column you are in).
- Then press CTRL+SHIFT and RIGHT ARROW key to select the entire columns to the right of the first column that you clicked.
- On the Edit menu > click Delete.
- Click the first blank row below the last row in the data.
- Press CTRL+SHIFT, and DOWN ARROW keys to select entire rows below the first row that you clicked.
- On the Edit menu > click Delete
Please Note: For removing any formatting from the remaining cells continue to follow these steps.
- Now click the small cell between the first-row heading > first column heading to choose the entire worksheet.
- Then on the Format menu,> click Cells > and click the Border tab.
Please Note: well the formatting added to the remaining cells might vary and step 8 adopts that you need to remove border formatting. To remove other types of formatting, you might need to change settings under another tab in the Format Cells dialog box.
- Click None > OK.
- Next, in the row click any cell where you need to insert a row.
- On the Insert menu > click Row > to insert a column > Column.
Hope this works for you to fix to prevent possible loss of data Excel error. But if not then make sure to clear the entire recent changes you made to your workbook and after that check if the issue is resolved or not.
Solution 3- Use The Visual Basic Editor For Adding Rows And Column
When Excel won’t let you insert columns or rows after the occurrence of this error then you can use the VB editor to fix this issue.
In the Visual Basic Editor, you have to enter only a single line of code which will reset the used area of your Excel spreadsheet.
- Make a right-click on the worksheet tab mainly where you are rendering issues to add new rows or columns. After then choose the View Code option.
- Now hit the Ctrl+G button from your keyboard to open the Immediate window, like this:

- In this opened Immediate window, you have to type the ActiveSheet.UsedRange. After this press the Enter button. This command will change the used range of the worksheet.
- Choose the File and then tap the Exit option. This will close the Visual Basic Editor.
Now you can easily insert new columns or rows as per the need in your worksheet.
Solution 4- Remove Blank Cells In Excel
Deleting up the empty cells will surely gonna fix Excel cannot shift non-blank cell issue.
Before trying this method it’s better to make a backup of the worksheet.
Now carry out the below-given steps to delete blank cells in Excel:
- Make the range selection first from where you have to remove the blank cells. Choose all the cells having data in them. After that hit the upper left cells and then press the Ctrl + Shift + End. This will automatically extend the last used cell’s selection.
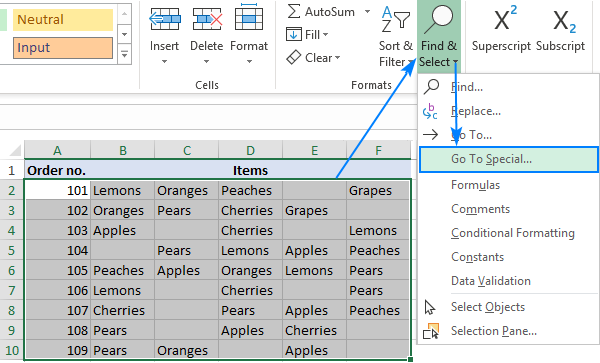
- Now from your keyboard press the F5 button and tap the Special…. Alternatively, hit the home> Formats group> Find & Select > Go to Special:

- From this opened Go To Special dialog box choose Blanks and tap the OK. Choose entire blank cells present in the range.

- Make a right-click over the selected blank cells and then from the context menu choose the Delete button.

- As per the data, layout chooses either the shift cells up or shift cells left option and then click the OK button.

Here I am choosing the “ shift cells left” option. Now you will see that blank space is been removed from your table.
Tip: If any step goes wrong meanwhile performing the above step then you can correct it by pressing the Ctrl + Z option.
Also Read: Microsoft Excel Can’t Insert New Cells (11 Quick Methods)
Related FAQs:
What To Do When Excel Says Cannot Shift Objects Off Sheet?
When Excel says cannot shift objects off sheet then you can simply change the setting from Nothing to All.
What Should I Do If this Error Persists After Applying the Suggested Solutions?
If the above suggested tricks fail, you can seek help from Excel professionals or community support websites.
Why Can't I Insert Non-Blank Cells in Excel?
This might happen if the last column or row of your worksheet contains data.
What Is the Shortcut to Insert Blank Cells in Excel?
Ctrl+Shift+plus sign (+) is the shortcut to insert blank cells.
Can I Prevent This Error from Occurring in The Future?
Yes, you can avoid this error by evading excessive use of merged cells, frequently reviewing your spreadsheet for hidden elements, and keeping your data organized & concise.
How Do I Delete Non Blank Cells In Excel?
To delete non blank cells in Microsoft Excel, follow these steps:
- Select the cells range where you need to remove blanks.
- Then, press F5 & click Special >> Go To Special dialog box, choose Blanks >> click OK.
- Make right-click on any of the selected blanks and then choose Delete option from a context menu.
Bottom Line
The error “To prevent possible loss of data Excel cannot shift nonblank cells of the worksheet” can be frustrating, nonetheless with the right resolutions, it can be easily fixed. By understanding the causes and implementing the solutions suggested above in this post, you can efficiently manage & prevent this error in your Excel worksheets.
If in case you have any additional questions then ask them on our Facebook and Twitter page.
Good Luck…
Priyanka Sahu
Priyanka is a content marketing expert. She writes tech blogs and has expertise in MS Office, Excel, and other tech subjects. Her distinctive art of presenting tech information in the easy-to-understand language is very impressive. When not writing, she loves unplanned travels.