In Microsoft Excel, the Checkbox is an interactive feature commonly used to make binary selections. Even though it is used to select or deselect the options. However, it has three states for selection: Select, Unselect, and Intermediate. Therefore, if you want to use this feature & also eager to learn how to insert checkbox in Excel, follow the step-by-step guide mentioned below in this tutorial.
How to Insert Checkbox in Excel?
In this section, you are going to learn how to insert checkbox in excel 2010 by following the below steps.
-
Enable Developer Tab in Excel Ribbon
To insert the checkbox, you must first ensure that the Developer tab must be enabled in your workbook. If not, the first step for inserting a checkbox in MS Excel is adding the Developer tab in the Excel ribbon.
Below are the instructions to do so:
- Make a right-click anywhere on the ribbon tab.
- Choose the option Customize the ribbon.

- Here, scroll down and check the option box for Developer.
- Tap OK and exit.

-
Add Checkbox from Developer Tab
Once the Developer tab is visible on the Excel ribbon, the next step is to add a checkbox from there. For this, follow the below instructions:
- Head to the Developer tab on the ribbon.
- Tap on the dropdown icon for Insert to expand it.

- Next, click on the Checkbox icon under Form Controls.

- Once selected, tap on any cell in your workbook to insert a checkbox.
-
Edit the Checkbox and Copy it to Other Cells
The last step is to edit the checkbox and copy it to other cells. Follow the below guidance for editing and copying checkbox to other cells.
- Go to the Checkbox cell.
- Make right-click on it and select Edit Text.

- Now, edit it as per your requirement.
- Once done with editing, drag the checkbox to copy the same in other cells as well.

Also Read: How To Insert Animated GIF Images In Excel 2007/2010/2013/2016?
Create An Interactive To-Do Checklist in Excel
Well, you can also create an interactive checklist in Excel 2010/2013/2016/2019 by just linking the checkbox cells with other cells. This will make your worksheet interactive.
Follow the below steps to create an interactive checklist.
- Go to the Checkbox cell and make right-click on it.
- Next, select the Format Control option on the appeared sub-menu.

- If the cell has unselected checkbox, select the Unchecked option.
- Now, click on the Cell link and tap on the cell to which you want to link it, and click OK.

- Copy the same process for all the items listed.
- Once done, you’ll be seeing that linked cells are automatically displaying the output as per your checkbox.

How To Insert Multiple Checkboxes in MS Excel?
If you want to know how to insert multiple checkboxes in Excel then copy either a checkbox or a cell which holds the checkbox.
- Once you have inserted the checkbox, make right-click on it & select the ‘Format control’.

- Then, click on a ‘Properties’ tab under the dialog box of ‘Format Control’.
- Here, ensure the ‘Move but don’t size with cells’ option is selected >> click OK button.

- After this, copy or drag that cell which contains an original checkbox wherever you want it.
- Now, users will able to specify which upsells they need.
How To Delete A Checkbox In Excel?
You can delete a checkbox by using the following ways.
First method:
To delete a checkbox in Microsoft Excel:
- Go to the checkbox that you want to delete and make right-click on it.
- Then, click on the Cut or Delete option on the appeared context menu.
- The checkbox should now be deleted from the worksheet.
Second Method:
Alternatively, you can also try the below instructions to delete the checkbox:
- Select the checkbox that you want to delete.
- Then, press the Delete key on your keyboard to remove it.
Third method:
Use the selection pane to delete them.
- Go to the Home tab→Editing.
- Click on the Find & Select category and choose Selection Pane.
- In the selection pane, you will get the list of all the checkboxes you have used in your worksheet.
- Select the checkbox you want to delete and click on the eye icon to remove it.
How to Set the Checkbox Position in MS Excel?
At times, users can face an annoying issue while inserting checkbox in Excel that is moving checkboxes while resizing or deleting the cells.
However, to stop this problem, follow the below steps:
- Left-click the checkbox >> choose Format Control.

- Next, click on a ‘Properties’ tab under the dialog box of ‘Format Control’.
- Find the Object Positioning & select the option “Don’t move or size with cells.”
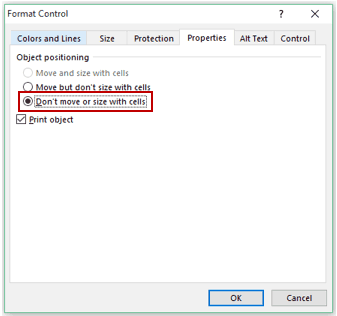
- Finally, click OK.
Now, try to resize/delete cells, your checkbox would remain stable in the same position.
Related FAQs:
How do checkboxes work in Excel?
Checkboxes work in Excel when the Developer tab is enabled on your workbook. So, if you want to know how to insert checkbox in excel 2016, you must ensure that Developer tab is enabled. Checkboxes help the users to make binary selections.
How to align checkboxes in Excel?
To align the checkboxes in a worksheet, you need to select the checkbox cell and on the Quick Access Toolbar, select the Alignment that you want to set it as.
How to add multiple checkboxes in Excel?
If you want to add multiple checkboxes in your workbook, follow the instructions below:
- Add the Developer tab on the ribbon as guided above.
- Next, go the Developer tab and click the Insert dropdown icon.
- Under the Form Controls, tap the Checked box.
- Now, click on the cell in your workbook where you want to insert the checkbox.
- Next, adjust the checkbox in the cell and then use the drag fill to copy the checkbox to other cells.
Also Read: How To Use Maxifs In Excel?
Wrap up:
Hope, your question on how to insert a checkbox in Excel got well answered in this article. Now, follow the mentioned steps to add a checkbox and create an interactive checklist.
Also, if in case your Excel workbook gets corrupted or starts showing errors, run the Excel Repair Tool. It will help you to repair corrupt, damaged, Excel files and as well as recover Excel file data easily.
If you are having any queries or doubts, feel free to comment us on Facebook or Twitter.
Priyanka Sahu
Priyanka is a content marketing expert. She writes tech blogs and has expertise in MS Office, Excel, and other tech subjects. Her distinctive art of presenting tech information in the easy-to-understand language is very impressive. When not writing, she loves unplanned travels.