In MS Excel, extracting images can be a challenging task if you don’t know the right solutions. Whether you need to save pictures for presentations, reports, or other documents, numerous methods make this process simple & efficient. You will find all the possible ways to extract images from Excel files effortlessly.
So, without wasting any more time let’s get into the blog.
To repair Excel file and extract data from the file, we recommend this tool:
This software will prevent Excel workbook data such as BI data, financial reports & other analytical information from corruption and data loss. With this software you can rebuild corrupt Excel files and restore every single visual representation & dataset to its original, intact state in 3 easy steps:
- Try Excel File Repair Tool rated Excellent by Softpedia, Softonic & CNET.
- Select the corrupt Excel file (XLS, XLSX) & click Repair to initiate the repair process.
- Preview the repaired files and click Save File to save the files at desired location.
Why Extract Photos from Microsoft Excel?
Many Excel spreadsheets contain treasured pictures such as charts, company logos, and embedded graphics. However, extracting these photos can assist you in reusing them effectively for presentations, reports, or marketing materials.
Therefore, it is important to know the correct methods to get high-quality images without losing resolution.
How to Extract Images From Excel?
Let’s know how it is to be done….!
1# Using Imageorprintoptions
It is possible to extract images from Excel files and then save them to the local drive using the Imageorprintoptions.
Here is the sample code that you can use to extract images from Excel file and then save them.
//Source directory
string sourceDir = RunExamples.Get_SourceDirectory();
//Output directory
string outputDir = RunExamples.Get_OutputDirectory();
// Open a template Excel file
Workbook workbook = new Workbook(sourceDir + “sampleExtractImagesFromWorksheets.xlsx”);
// Get the first worksheet
Worksheet worksheet = workbook.Worksheets[0];
// Get the first Picture in the first worksheet
Aspose.Cells.Drawing.Picture pic = worksheet.Pictures[0];
// Set the output image file path
string picformat = pic.ImageType.ToString();
// Note: you may evaluate the image format before specifying the image path
// Define ImageOrPrintOptions
ImageOrPrintOptions printoption = new ImageOrPrintOptions();
// Specify the image format
printoption.ImageType = Drawing.ImageType.Jpeg;
// Save the image
pic.ToImage(outputDir + “outputExtractImagesFromWorksheets.jpg”, printoption);
To get detailed information on how to convert Excel workbook/worksheet to image file, check out this article.(https://docs.aspose.com/cells/java/render-the-worksheet-and-workbook-to-image-using-imageorprintoptions/)
2# Extract Multiple Images At Once From Excel Workbook
Another method that you can try to extract multiple images from Excel is by saving your workbook as a web page.
Using this method not only the images but also the shapes, objects, and charts are also gets saved into the folder.
Here are the steps that you need to follow:
- Open the workbook that contains images you are willing to save.
- Go to the File menu and hit the Save As option. This will open the Save As a window on your screen.

- Now you need to select the Excel file from which you want to extract the images.
- Hit the Save as type drop-down list and choose the Web Page format.

- Tap the save button, and then go to the specified folder.
Here you will there are two files present, first one is in the HTML file format and the second one is a folder that contains all the extracted charts pictures, objects, etc. of your workbook.

- Now you can simply drag the extracted images to some other folder as per your need.
Also Read: How to Remove Compatibility Mode in Excel – No Tech Skills Needed!
3# Extract The Actual Images From The Image URL Addresses
Use the following VBA code to quickly extract actual pictures from the image URL in the Excel workbook.
- Press the ALT + F11 This will open the VBA editor window.
- Go to the Insert tab and choose the Module option. Now paste the complete code given below in your opened Module Window.
VBA code: extract actual images from image URLs in Excel:
Sub URLPictureInsert()
Dim Pshp As Shape
Dim xRg As Range
Dim xCol As Long
On Error Resume Next
Application.ScreenUpdating = False
Set Rng = ActiveSheet.Range(“A2:A5”)
For Each cell In Rng
filenam = cell
ActiveSheet.Pictures.Insert(filenam).Select
Set Pshp = Selection.ShapeRange.Item(1)
If Pshp Is Nothing Then GoTo lab
xCol = cell.Column + 1
Set xRg = Cells(cell.Row, xCol)
With Pshp
.LockAspectRatio = msoFalse
If .Width > xRg.Width Then .Width = xRg.Width * 2 / 3
If .Height > xRg.Height Then .Height = xRg.Height * 2 / 3
.Top = xRg.Top + (xRg.Height – .Height) / 2
.Left = xRg.Left + (xRg.Width – .Width) / 2
End With
lab:
Set Pshp = Nothing
Range(“A2”).Select
Next
Application.ScreenUpdating = True
End Sub
Code illustration:
- In the above-mentioned code, A2:A5 is the cell range having the URL addresses from which you want to extract the images. Well, you can change these cell references as per your need.
- Using the above code, you can also assign the size for your extracted images.
- Remember one thing that your extracted images will automatically get into the cell present next to the image URL column. You will get no option to save your extracted images to any specific cell.
- Basic knowledge of coding is important if in case of any character problem rendered.
- Press the F5 key for the execution of the above code. Within a few minutes, you will see that all your pictures will get extracted from the image URLs and they get saved in the column adjacent to the image URL.
4# Using The File Extension
In this method, file extensions play a very important role. So at first, you need to go to the folder in which you have kept your Excel file from which you need to extract the images.
- Go to the Organize > Folder> Search Options.

- Now click on the View and remove the checkmark from Hide extensions.
- Doing this will start displaying the entire file along with their extensions.
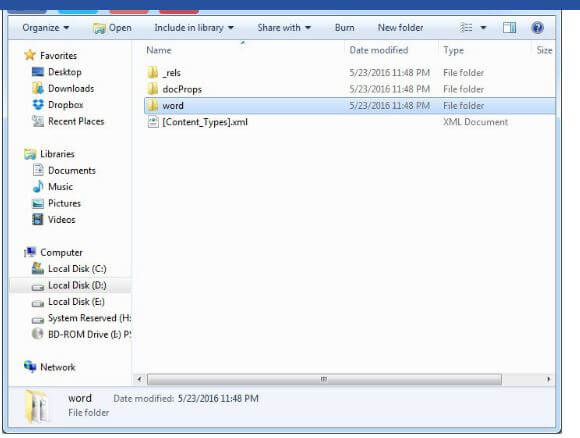
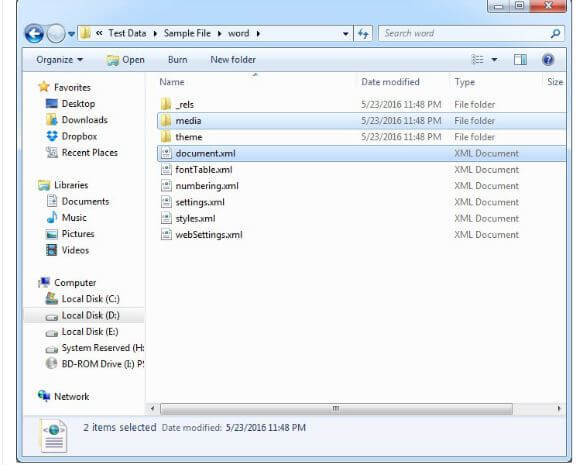
- Choose the Excel file from which you need to extract the image and then change the extension to “zip”.

- Your Excel file is now changed to a zip extractable file. Now make a right-click over it and hit the Extract files.

You will see two “Document.xml” files here. It is an XML file having all the text of the original word file. You can open it using the XML editor or simple notepad. You will also see a folder named “Media”. Just click it and you will see all the images of your original file here. The media folder saves the extracted images.
In this way, you can extract images from Excel files.
If in case your MS Office version fails to extract images with the above method. In that case, you can take the help of an Office Extraction Wizard which is a freeware tool.
5# Extract Images From Excel Using Imageoptions Class And Getimages Methods
Another method that you can use to extract images from Excel spreadsheets is by using the Imageoptions Class And Getimages Methods.
Using this method images are been extracted in their original format.
This ImageOptions class helps in the easy extraction of images from Excel workbook in the following format gif, WEBP, jpeg, BMP, png.
Whereas, the getImages method will return you the null value if in case of image extraction doesn’t support Excel file.
If image extraction isn’t be supported by the CSV file then you will get the null value from “getImages” method.
Here is the complete example to show you how to extract images from Excel workbook.
Copy// Create an instance of Parser class
try (Parser parser = new Parser(Constants.SampleWithImagesXlsx)) {
// Extract images from spreadsheet
Iterable<PageImageArea> images = parser.getImages();
// Create the options to save images in PNG format
ImageOptions options = new ImageOptions(ImageFormat.Png);
int imageNumber = 0;
// Iterate over images
for (PageImageArea image : images)
{
// Save the image to the png file
image.save(Constants.getOutputFilePath(String.format(“%d.png”, imageNumber)), options);
imageNumber++;
}
}
Essential Tips for Extracting Image Files
Here are the best practices that can be followed for extracting the pictures from Excel:
- Use the correct method like web page method instead of VBA technique.
- Use JPEG or PNG file formats to retain quality.
- Make sure pictures keep their original resolution after extraction.
Related FAQs:
How to Extract a Graph from Excel?
To extract a graph from Microsoft Excel, you need to copy & paste it into another program, or you can save it as a photo. After that you will be able to export a graph as a PDF.
Is There an Extract Function in Excel?
Yes, MS Excel offers various built-in functions that can help you extract specific portions of text strings. LEFT(), RIGHT(), MID(), etc. are some of the extract functions.
How Do You Export as A Picture from Excel?
Select the spreadsheet cells, or you can click on the chart/object you need to copy as an image. Navigate to Home tab, under the Clipboard group, you have to click on the arrow next to Copy >> click Copy as Picture.
Conclusion
Hope, your question on how to extract image from Excel sheet got well answered in this blog. All you need to do is to follow the methods one after another to get your cherished photos extracted.
Also, if in case your workbook gets corrupted or showing errors, you can opt for the Excel Repair Tool. This utility will help you to repair corrupt or damaged Excel files and recovers all the data saved within them.

Priyanka Sahu
Priyanka is a content marketing expert. She writes tech blogs and has expertise in MS Office, Excel, and other tech subjects. Her distinctive art of presenting tech information in the easy-to-understand language is very impressive. When not writing, she loves unplanned travels.