Want to know how to convert text to date in Excel sheet? If so, do not fret, you are reading the correct webpage.
Converting text to date format in Microsoft Excel can be a challenging task. However, there are some easy ways available in this post that can assist you in the conversion process. So, let’s check out this guide to convert text strings into proper Excel dates without errors.
To fix Excel file & recover its worksheet data, we recommend this tool:
This software will prevent Excel workbook data such as BI data, financial reports & other analytical information from corruption and data loss. With this software you can rebuild corrupt Excel files and restore every single visual representation & dataset to its original, intact state in 3 easy steps:
- Try Excel File Repair Tool rated Excellent by Softpedia, Softonic & CNET.
- Select the corrupt Excel file (XLS, XLSX) & click Repair to initiate the repair process.
- Preview the repaired files and click Save File to save the files at desired location.
Why Text-to-Date Conversion in Excel Important?
As we all know, Microsoft Excel stores dates as serial numbers. When dates stay in text format, then sorting & filtering process fail and formulas in the spreadsheet also break.
Hence, changing the text to date format is vital as it enhances the data accuracy, avoids calculation mistakes, and save time during data analysis.
How to Convert Text to Date in Excel Sheet?
Follow the steps below to convert text to date in Excel with a formula or without a formula.
Way 1- Use the Text to Columns Feature
The Text to Columns is an excellent feature in Excel that splits & reformats text into dates created on delimiters or date recognition.
Here is how you can use this tool for the conversion process:
- Select the cell(s) that hold text dates.
- Next, go to the Data tab >> Text to Columns.
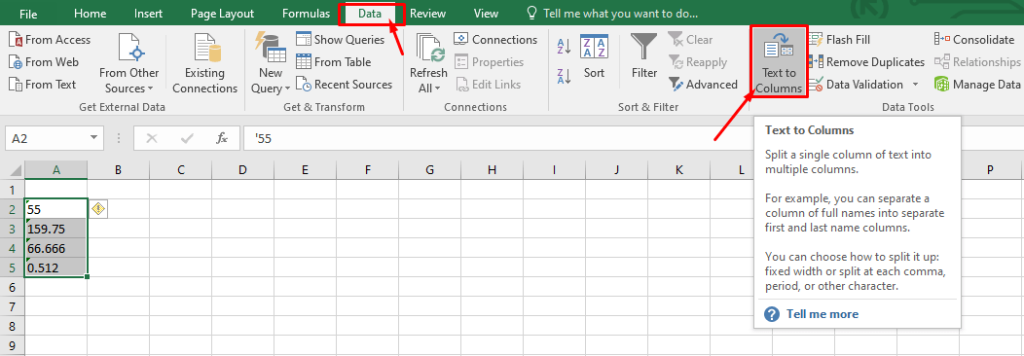
- Click on Delimited >> hit Next.
- Proceed without selecting any delimiter.
- Now, pick Date in a Column Data Format.
- Select the accurate order like DMY or YMD >> hit Finish.

You are done!
In case this method fails, try the further techniques.
Also Read: How to Convert Text to Number in Excel (6 Easy Ways)
Way 2- Using Flash Fill
Here I will show you how to convert text to date format in Excel using Flash Fill. This option helps to recognize date patterns more efficiently, but it is less effective than the previous method.
Follow the instructions below to use this option:
- Enter the accurate date format manually in the next column.
- Then, press Ctrl + E.
- Flash Fill completes the pattern.
Way 3- Change Text Strings to Date Using DATEVALUE
DATEVALUE function in MS Excel helps to convert a text string into a serial number that the Excel software recognizes as a date. But remember that this method is advanced and can be used when you want formula-based control.
Formula to Use:
=DATEVALUE(A1)
After applying the above formula, change a cell format to Short Date. The value becomes a real date.
Way 4- Apply the Custom Date Formats
Another workable method you can try is to apply the custom date format. This technique ensures your dates look appropriate and correct.
Here is how to convert text to date in Excel by applying the custom formats:
- Open the Excel workbook.
- Then, right-click a cell to select Format Cells.

- Choose Date or Custom.
- Now, apply a format such as dd-mm-yyyy
Your date remains the same but displays in a preferred style.
Way 5- Use VALUE Function
Like DATEVALUE, there is another underrated function that can be used is the VALUE. This formula also helps to converts a word into a numeric value.
Formula to Use:
=VALUE(A2)
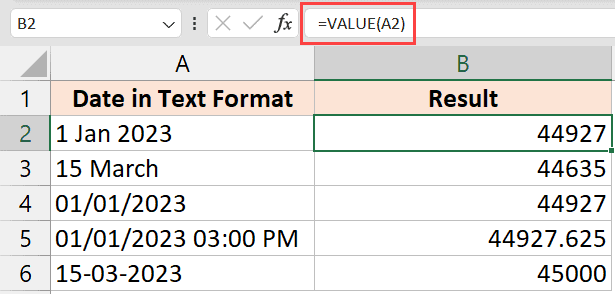
The result turns into a valid Excel date and time. You can then format it as needed. Moreover, this function is useful for imported data.
Way 6- How to Convert Text to Date in Excel by Using Power Query
In MS Excel, Power Query is a powerful tool for connecting to, shaping, and converting data from numerous sources into a usable format. Besides, it saves time & enables better analysis via features such as removing errors, merging tables, and changing types without complex coding.
So, let’s try this feature.
- Select your data >> click on the Data.
- Choose From Table/Range.
![]()
- Under the Power Query, you have to choose the column.
- Now, click Data Type >> Date.

After completion of these steps, the value becomes a real date.
Also Read: How to Convert Excel to Word Without Losing Formatting?
Unique FAQs:
How to Change Date Format in Excel from Text to DD MM YYYY?
To change date format in Excel from text to DD MM YYYY, follow the steps below:
- Select the cell(s) you want to format.
- Then, press CTRL+1.
- Under a Format Cells box, click on Number tab.
- Go to Category list, choose Date.
- In Type, pick a date format (DD MM YYYY).
What Is the Shortcut Key to Change a Number to a Date?
The shortcut to format a cell as a date, simply press CTRL + SHIFT + 3 from the opened spreadsheet. But if you want to format it as time, then press CTRL + SHIFT + 2.
How Do I Convert Text to Date in Power Query?
To convert text string to date in Power Query, follow these steps:
- Select the column(s) that hold the text data.
- Click on the ‘Transform’ tab >> ‘Data Type’ option.
- Choose ‘Date’ from a dropdown list of data types.
Wrapping Up
Well, this is all about how to convert text to date in Excel sheet in easy methods. Though I tried my best to put together the possible ways that will help you out. Simply follow the given steps one by one and change words to YYYYMMDD in MS Excel effortlessly.
Thanks for reading this post!

Priyanka Sahu
Priyanka is a content marketing expert. She writes tech blogs and has expertise in MS Office, Excel, and other tech subjects. Her distinctive art of presenting tech information in the easy-to-understand language is very impressive. When not writing, she loves unplanned travels.