Deleting infinite columns in Microsoft Excel is a tedious task, which typically means removing unused or unnecessary columns from the spreadsheet to the right of your data. This action helps to clean up your spreadsheet & make it more manageable. In this blog, you will learn a step-by-step guide on how to delete infinite columns in Excel, ensure the smooth functioning of your worksheets, and boost productivity.

To repair corrupted Excel file, we recommend this tool:
This software will prevent Excel workbook data such as BI data, financial reports & other analytical information from corruption and data loss. With this software you can rebuild corrupt Excel files and restore every single visual representation & dataset to its original, intact state in 3 easy steps:
- Try Excel File Repair Tool rated Excellent by Softpedia, Softonic & CNET.
- Select the corrupt Excel file (XLS, XLSX) & click Repair to initiate the repair process.
- Preview the repaired files and click Save File to save the files at desired location.
So, let’s delve deep into this blog…
What are the Best Practices to Be Followed When Deleting Infinite Columns?
Before moving towards the methods for how to delete infinite blank columns in Excel, it is vital to understand the important tips to be followed to avoid the inconsistency of data.
- Save Your Crucial Work- It is a virtuous idea to save your work before deleting columns or rows in an Excel sheet.
- Use Shortcuts- Another crucial tip that you need to follow is to use keyboard shortcuts to delete columns. This will save you time and effort.
- Be Careful While Deleting Columns- Always be careful and double-check that you have selected the accurate columns before you remove them from a spreadsheet.
- Undo Changes- While deleting the unnecessary columns if you make any mistake, you can press CTRL+Z keys together to undo the recent changes.
How to Delete Infinite Columns in Excel Worksheet?
In this section, you will find 2 effective ways to remove infinite columns in Excel with less effort. So, let’s try them.
Quick Resolutions:
Method 1- Use Manual Selection & Deletion
Note: If your spreadsheet contains a huge amount of data, it is not recommended to try this method. As this method is more time-consuming and may lead to data inconsistencies.
The very first and easy trick that you can try is manual selection & deletion. If your worksheet contains less data, follow the below steps for infinite column deletion.
- First of all, select the infinite blank columns by pressing Shift + down arrow to the row up to where you need to choose the column.
- After this, make right-click on a selected column.

- Then, find and click on “Delete” option from an appearing options list. This will immediately delete the selected column from the spreadsheet.

Also Read: Say Goodbye to Clutter: How to Delete Highlighted Cells in Excel?
Method 2- How to Delete Infinite Columns in Excel with ‘Go To Special’ Feature?
Go To Special is an excellent feature in Microsoft Excel that can also assist you in deleting infinite rows and columns in Excel sheets. Here’s how to use this feature to get your job done:
- Open the Excel sheet from which you need to delete the columns.
- Now, select the entire data of the sheet & press the F5 key from your keyboard. Then, select Special from the dialog box.
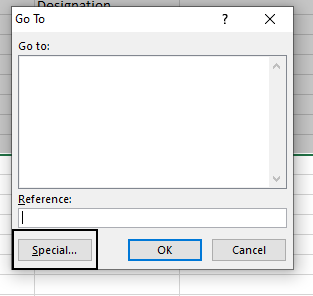
- After that, click on the Blanks >> select OK This will select all the infinite blank columns from the selected data.

- Next, navigate to Home tab >> in the Cells Group >> click Delete. This will help you to delete the selected rows, columns, cells, and entire worksheet.
- Then, choose Delete Cells from a dropdown list.
All the infinite columns from a selected range will be removed.
Method 3- Using VBA Code
If you often need to delete infinite Excel columns, you can use a VBA (Visual Basic for Applications) script to automate the process. For this, you have to:
- In the opened sheet, press Alt + F11 keys simultaneously to open a VBA editor.

- Under the VBA editor, click on Insert > Module to generate a new module.

- Now, copy & paste the below VBA code into the opened window:
Sub
DeleteInfiniteColumns() Dim LastCol As Long Dim ws As Worksheet Set ws = ActiveSheet ‘ Find the last column with data LastCol = ws.Cells.Find(“*”, [A1], xlFormulas, xlPart, xlByColumns, xlPrevious).Column ‘ Delete all columns to the right of the last column with data ws.Columns(LastCol + 1 & “:” & ws.Columns.Count).Delete
End Sub
- Then, exit from the VBA editor.
- Press the Alt + F8 keys to open the “Macro” dialog box.
- Choose “DeleteInfiniteColumns” >> click Run.
And you are done!
Also Read: Remove Gridlines in Excel Chart? – Visualize Data like a Pro!
Related FAQs:
No, there are limited cells in Microsoft Excel. A single spreadsheet contains 1048576 rows & 16384 columns.
No, you cannot make unlimited rows in a single Excel spreadsheet. However, you can eventually create a new Excel worksheet to add more rows.
It is likely due to the protection settings of the Excel worksheet.
You can use the formula field with ‘SUM(A:A)’ & replace ‘A:A’ with the indefinite range you want to total.
By pressing Ctrl + Space to select the entire column you want to delete. Then, right-click on the selected columns & select ‘Delete’ option.
According to Microsoft, Excel has a row limitation of 1,048,576 and 16,384 is the column limitation.
Firstly, select one or more unused columns in the worksheet, then right-click the selected columns >> select Hide option. Are There Infinite Cells in Excel?
How to Make Unlimited Rows in Excel?
Why I Can't Delete a Row or Column from Excel?
How Do I SUM Infinite Columns in Excel?
How Do You Delete Thousands of Blank Columns in Excel?
Does Excel Have Unlimited Rows and Columns?
How Do I Make Unused Columns Disappear in Excel?
Final Verdict
So, this is all about how to delete infinite rows and columns in Excel spreadsheet. Simply follow the step-by-step methods outlined in this blog to remove these infinite columns and make your spreadsheet manageable without unnecessary distractions.
I hope you enjoyed reading this post!
Priyanka Sahu
Priyanka is a content marketing expert. She writes tech blogs and has expertise in MS Office, Excel, and other tech subjects. Her distinctive art of presenting tech information in the easy-to-understand language is very impressive. When not writing, she loves unplanned travels.