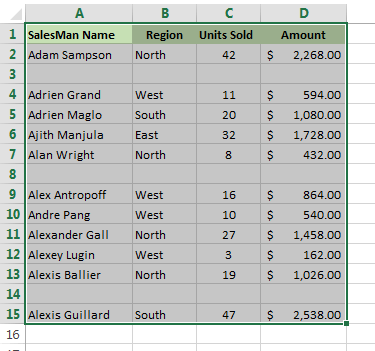
Blank rows in Excel can clutter your spreadsheet data and make it harder to analyze. Hence, it is important to remove such blank rows to make your worksheet clear. Removing them efficiently saves time and ensures cleaner spreadsheets. Here’s the step-by-step guide on how to remove blank rows in Excel effectively to make the report understandable and readable.
To recover corrupt Excel file, we recommend this tool:
This software will prevent Excel workbook data such as BI data, financial reports & other analytical information from corruption and data loss. With this software you can rebuild corrupt Excel files and restore every single visual representation & dataset to its original, intact state in 3 easy steps:
- Try Excel File Repair Tool rated Excellent by Softpedia, Softonic & CNET.
- Select the corrupt Excel file (XLS, XLSX) & click Repair to initiate the repair process.
- Preview the repaired files and click Save File to save the files at desired location.
Why It Is Important to Delete Unnecessary Blank Rows from Sheet?
Removing blank Excel sheet rows is important for several reasons. Here are the main reasons:
- Makes the worksheet clean and easy to interpret.
- It ensures correct results when analyzing the data.
- Helps in avoiding errors.
- Removing the needless rows also reduces the time spent fixing issues
- Improves the visual appeal & readability of your spreadsheet.
Also Read: Remove Hyperlink in Excel Like a Pro!
How To Remove Blank Rows In Excel?
Well, blank spreadsheet rows interrupt data continuity and cause errors in calculations & sorting. Removing them is necessary, follow the below methods to remove all blank rows in Excel sheet and ensure your worksheet remains organized and functional.
Quick Navigation:
Method 1: Utilize Go To Special to Delete Blank Rows In Excel
Make use of the ‘Go To Special’ feature to find the blank rows in Excel so that you can delete them easily:
Follow the ways to do so:
- Open Excel sheet in which the blank rows needed to be deleted
- And, select your data range.
- Navigate to Home > Find & Select > Go To Special
- Now, in the Go To Special dialog box, click the ‘Blanks’ radio button and OK

- This will select all the blank cells immediately and you need to delete them

- Move to Home > Delete > Delete Sheet Rows without clicking anywhere on the sheet (otherwise your selection will be removed)

- And, the entire unfilled rows will be deleted.

Please Note: You need to be careful about one thing, if there are any missing values in any column they also get deleted and the displaced data can cause inconsistency.
*Bonus Tip: You can do the above step by making use of the keyboard, all you need to press the given keys after selecting the data:
Press: F5 Alt+S K {Enter} Ctrl – {Enter}
Method 2: Use Excel Find Functionality to Remove Excel Blank Rows
Now in this step to remove Excel blank rows make use of the Excel Find feature:
Follow the complete steps to do so:
- Select your data set > press Ctrl + F keys to open the Find and Replace dialog.
- Now, click the “Options” button > select “Values” from “Look in” And let the “Find What” text box blank > click “Find All”.

- After this “Find and Replace” dialog displays the entire blank cells.
- Click any one record > press Ctrl + A for selecting the entire blank cells.

- Next, close the “Find and Replace” dialog and without clicking anywhere else go to Home > Delete > Delete Rows.
- Doing this will delete the entire selected rows.
Method 3: Use Key Column To Delete Empty Rows In Excel
The Key column works if there is a column in your table, as this helps to verify if it is an empty row or not (a key column).
Save the rows order, to sort the table by that column to move the blank rows to the bottom.
Follow the steps:
- Select whole table, from the 1st to the last row > press Ctrl + Home > press Ctrl + Shift + End.

- Now, add AutoFilter to the table and go to the Data tab > Filter

- And apply the filter to the “Cust #” column > click the arrow in the column header > uncheck the (Select All) check box > and scroll down to the end of the list > check the checkbox (Blanks) at the very bottom of the list > click OK.

- Next, select the entire filtered rows > press Ctrl + Home > hit the down-arrow key to go to the first data row > and press Ctrl + Shift + End.

- Right-click on any selected cell > select Delete row from the context menu or hit Ctrl + – (minus sign).
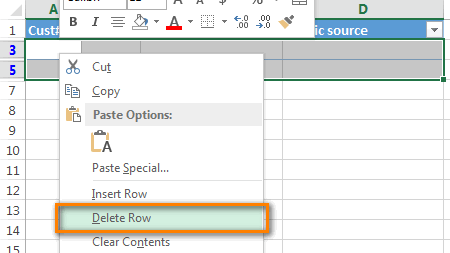
- Then click OK in the “Delete entire sheet row?” dialog box.

- And clear the applied filter: Go to Data tab > hit Clear

- This will delete blank rows completely.

Method 4: Utilize Excel Filter Functionality to eliminate blank rows in Excel
Make use of the Excel’s Auto Filter Functionality to remove Excel blank rows.
Follow the given steps to do so:
- Select the range from where you need to remove the blank rows.
- Go to Home > Sort and Filter > Filter or else press the Shift + Ctrl + L keys to apply a filter.

- Next select column > click filter drop down and uncheck the entire values excepting Blanks and click OK

- And with the entire blank rows selected > go to Home > Delete > Delete Rows. Lastly, remove the filter and you can see the blank rows are eliminated.

Method 5: Delete Blank Rows In Excel Macro:
This is the last step to delete blank rows in Excel macro. Well to make use of the macros for eliminating empty rows make use of the given code.
The code will internally use the same process of step 1.
Please note: Before running the macro code, select the range where you are trying to delete blank rows. And to run this code you need to enable Macros.
- Well, you can enable it in Excel go to File > Options > Trust Center > click Trust Center Settings.

- And in the Trust Center Settings window select the Macro Settings Select the security setting that you want to be applicable on macro execution.
The given steps are almost same for the Excel 2013 and earlier.
Follow the code:
Sub DeleteBlankRows()
Dim Rw As Range
If CountA(Selection) = 0 Then
MsgBox “No blank rows found”, vbOKOnly
Exit Sub
End If
With Application
.Calculation = xlCalculationManual
.ScreenUpdating = False
SpecialCells(xlCellTypeBlanks).Select
ForEach Rw InRows
If CountA(Selection.EntireRow) = 0 Then
EntireRow.Delete
End If
NextRw
.Calculation = xlCalculationAutomatic
.ScreenUpdating = True
End With
MsgBox “Blank Rows Removed”
End Sub
Method 6: Using the VBA Code
There is another method that you can try is running the VBA code. Here’s how you can perform this:
- Initially, press the Alt + F11 (Windows) >> choose Insert > Module.

- After that, you have to copy and paste the below code there and press F5 to run it:
vba
Copy code
Sub DeleteBlankRows()
Dim rng As Range
Set rng = ActiveSheet.UsedRange
On Error Resume Next
rng.SpecialCells(xlCellTypeBlanks).EntireRow.Delete
On Error GoTo 0
End Sub
- Blank rows will be removed automatically.
Automatic Solution: MS Excel Repair Tool
Make use of the professional recommended MS Excel Repair Tool to fix common Excel errors. This is the best tool to repair all sort of issues, corruption, errors in Excel workbooks. This tool easily restores entire corrupt excel files including the charts, worksheet properties cell comments, and other important data.
This is a unique tool to repair multiple excel files at one repair cycle. And also recovers the entire data in a preferred location. It is easy to use and compatible with both Windows as well as Mac operating system. This supports the entire Excel versions.
Steps to Utilize MS Excel Repair Tool:


Also Read: How to Remove Watermark in Excel in Seconds?
How to Avoid Blank Rows in the Future?
It is important to avoid blank rows in an Excel spreadsheet to make your spreadsheet clear and efficient Excel workbook.
- Use consistent data entry practices.
- It is important to always check for blank rows after you import data.
- Regularly clean the dataset.
Frequently Asked Questions:
What Is an Excel Row?
Rows are groups of horizontal rows that appear from left to right in an Excel workbook.
What Is the Shortcut for Removing Blank Rows in Excel?
You can use CTRL G (goto) as a shortcut to remove blank rows.
How Do I Remove Blank Lines in An Excel Cell?
Open the worksheet, find & highlight the empty blank lines you want to delete. Then, left-click the label field, ensure to highlight an entire row. When you done, right-click on label field. This shows a menu where you can select ‘delete’ to delete the empty cells.
How Many Rows Are in An Excel Sheet?
Microsoft Excel has a row limit of 1,048,576 rows & column limit of 16,384 columns.
What Is the Formula to Delete Multiple Blank Rows in Excel?
If you want to delete multiple blank rows in Excel, Press Ctrl + Home >> press a down-arrow key to navigate the first data row. After this, press Ctrl + Shift + End. After this, right-click on any of the selected cell and select ‘Delete row’ from the context menu.
Bottom Line
So, this is all about how to remove blank rows in Excel. You can try any of the ways mentioned above to remove all blank rows. All the specified methods are very effective & easy to use.
For additional queries, feel free to contact us on our Facebook & Twitter pages.
Good Luck….

Priyanka Sahu
Priyanka is a content marketing expert. She writes tech blogs and has expertise in MS Office, Excel, and other tech subjects. Her distinctive art of presenting tech information in the easy-to-understand language is very impressive. When not writing, she loves unplanned travels.