Want to know how to remove read-only from Excel in Windows 11/10? If yes, then read this post without skipping a single stanza. Removing the read-only restriction in MS Excel can help you edit, save, and share files in a hassle-free manner. By following the solutions mentioned below, you can do it quickly.
To fix corrupted Excel files, we recommend this tool:
This software will prevent Excel workbook data such as BI data, financial reports & other analytical information from corruption and data loss. With this software you can rebuild corrupt Excel files and restore every single visual representation & dataset to its original, intact state in 3 easy steps:
- Try Excel File Repair Tool rated Excellent by Softpedia, Softonic & CNET.
- Select the corrupt Excel file (XLS, XLSX) & click Repair to initiate the repair process.
- Preview the repaired files and click Save File to save the files at desired location.
Why is my Excel Sheet Showing “Read-Only”?
Sometimes, when opening an Excel workbook, it displays a “Read-Only” error. This simply means that you are unable to make changes directly. However, it keeps the original data protected from being overwritten. It happens due to various reasons, including:
- File Is Marked as Final
- The workbook is set as Password-Protected
- The document is opened from a network or shared drive
- File properties are set to read-only
- Antivirus or Security Software Is Interfering
- Files downloaded from unknown sources (Internet or Email) are often blocked for safety.
How to Remove Read-Only from Excel in Windows 11?
To alleviate the frustration caused by read-only error, try several methods discussed below:
Method 1- Check If a File Is Marked as “Read-Only”
The very first thing you can do to tackle this situation is to check if your document is set to read-only from the system itself. To check this:
- Go to the location where the file is stored.
- Right-click on the Excel file.
- Choose the Properties >> click on the General tab >> uncheck the Read-only

- Finally, click on Apply, then OK.
Now open the workbook again and check if it allows editing.
Also Read: How to Remove/Find Broken Links in Excel?
Method 2- Unlock a Protected Sheet with Password
If your Excel sheet is password-protected, then you also can’t modify or edit it. Well, you can easily unprotect the worksheet by entering the password.
Here are 3 easy ways to do so:
Way 1:
- Navigate to “Review” tab in an open protected sheet.
- Click on “Unprotect Sheet” >> enter the password to disable it.

Way 2:
- Open your MS Excel file, find the protected sheet in the bottom, and right-tap on it.
- Next, select the “Unprotect Sheet…”.
- Finally, enter the password.
Way 3:
- Click “Home” tab >> locate Cells section.
- Then, click on “Format” >> “Unprotect Sheet.”
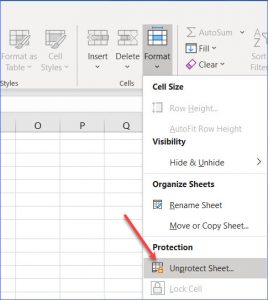
- Enter the password or click a button to unlock Excel files.
Method 3- Disabling Read-Only from MS Excel Settings
Many users have reported in the community sites that they removed this warning by disabling the read-only mode in Excel settings.
Here are the steps to be followed:
- Open the MS Excel document.
- Go to the File > Save As.
- Then, choose a new name of the file or location.

- Choose the Tools > General Options.
- Next, clear the Read-only recommended checkbox & save the file.
Method 4- Remove Workbook Protection
Sometimes, a protected workbook can also cause a read-only problem. However, you can follow the instructions below very carefully for how to remove read-only mode in Excel:
1- Open read only Excel workbook >> click File > Info.
2- Choose Protect Workbook >> Encrypt with Password.
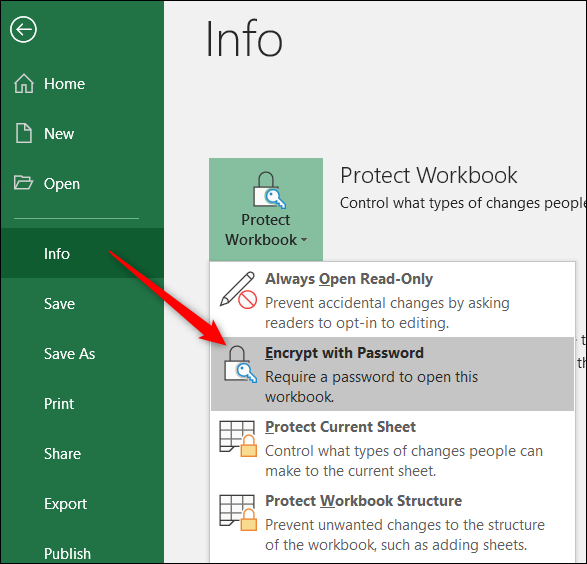
3- Now, clear the password field >> hit OK.

4- Save the file and try to edit it again.
Method 5- Change XLS/XLSX File Permissions
When trying to open the Excel document received from a shared network or Gmail, it definitely shows this read-only message. All you need to do is to allow the necessary permissions to edit and modify the spreadsheet.
- Go to the folder where the read-only file is stored.
- Right-click on the file > choose Properties >> Security.

- Choosethe user’s name or group.
- Then, click on Edit >> and check the Full Control.

- Now, apply & save the changes you have made.
Also Read: How to Remove Border from Excel Sheet (Do This First!)
Method 6- Check the Trust Center Settings
Microsoft Excel or other Office applications block external content such as photos, hyperlinks, and other media files. If you try to download an Excel sheet with these items, then it may open a blank workbook.
However, you will have to enable the content by adjusting the security settings.
- Open Microsoft Excel.
- Go to Options >> Trust Center>> Trust Center Settings.
- Next, click on Protected View.
- Now, Uncheck the below options:
- “Enable Protected View for files originating from the Internet”
- “Enable Protected View for files located in potentially unsafe locations.”
- “Enable Protected View for Outlook attachments” (Figure 1).

- Hit OK twice & restart Excel.
Method 7- How to Remove Read-Only from Excel by Saving the Copy to a New Location?
Still stuck with this error? Try saving a fresh copy.
- Open the MS Excel file.
- Go to the File > Save As.

- Select a new location & filename.
- Then, save & close the file.
- Now, check for the issue.
Method 8- Check for Macros or VBA Restrictions
Last but not least, if none of the above solutions worked, you can try this advanced resolution. Try running the VBA code and macro to unlock editing.
- Press ALT + F11 to open the VBA Editor.

- Look for locked modules or workbook protection.
- Remove any locking codes.
- Save and close the file.
Important Note: Be careful with this if you’re not experienced in VBA.
Frequently Asked Questions:
How to Unlock for Editing in Excel?
To unlock an Excel sheet for editing, follow the steps below:
- Go to the Review tab >> click Unprotect Sheet.
- If your sheet is protected with a strong password, you will need to enter it in a dialog box.
Why Is Excel Stuck in Read-Only?
Excel spreadsheets should be in read-only mode due to their properties’ settings.
How Do I Change Permissions in Office 365?
To modify permissions in Office 365:
- Open the file >> click on the three-dotted menu >> select Edit Permissions.
- Change to an Admin, individually or by group, and they will be able to edit a document only.
How to Activate Developer Mode in Excel?
If you want to activate developer mode in Microsoft Excel, then follow these steps:
- Navigate to File tab >> Options > Customize Ribbon.
- In the Customize Ribbon & under Main Tabs, choose the Developer checkbox.
Also Read: How to Remove Scientific Notation in Excel? – No More Confusion!
Closure
So, this is all about how to remove read-only from Excel in Windows 11. Simply follow the step-by-step methods specified in this post to unlock read-only access to your workbook without unnecessary distractions.
I hope you enjoyed reading this post!

Priyanka Sahu
Priyanka is a content marketing expert. She writes tech blogs and has expertise in MS Office, Excel, and other tech subjects. Her distinctive art of presenting tech information in the easy-to-understand language is very impressive. When not writing, she loves unplanned travels.