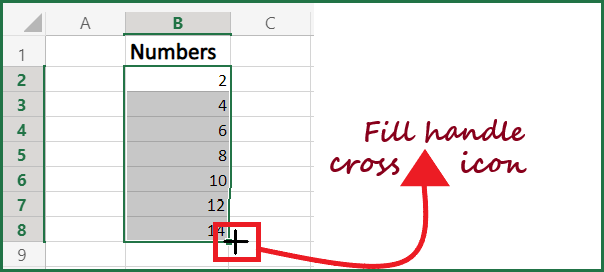
If you’re an Excel user, you are probably aware of the “Fill Handle” feature. It is a small square in the bottom right corner of a selected cell that allows you to auto-fill the list in spreadsheet columns or rows just by dragging through the mouse. However, encountering a situation where the fill handle not working in Excel worksheet can be frustrating. In this blog, I will discuss the reasons behind this issue and workable solutions to fix it.
To repair corrupt Excel file, we recommend this tool:
This software will prevent Excel workbook data such as BI data, financial reports & other analytical information from corruption and data loss. With this software you can rebuild corrupt Excel files and restore every single visual representation & dataset to its original, intact state in 3 easy steps:
- Try Excel File Repair Tool rated Excellent by Softpedia, Softonic & CNET.
- Select the corrupt Excel file (XLS, XLSX) & click Repair to initiate the repair process.
- Preview the repaired files and click Save File to save the files at desired location.
Why Isn’t My Fill Handle Working in Excel?
This can happen due to numerous reasons, like inconsistent data formatting or disabled features. Below you can find the most common factors for this problem.
- Disabled “Fill Handle” Feature- If you have accidentally disabled the ‘fill handle’ feature in Excel, it can lead to this issue.
- Lack of Data Consistency- Microsoft Excel may not diagnose the pattern or series in your data, leading to the fill handle does not work in Excel.
- Applied Filters- Excessive application of filters within Excel worksheet.
- Problems with Settings- Certain Excel settings or configurations may also affect the functionality of a fill handle option.
As you have learned why is drag and fill handle not working in Excel worksheet, now let’s know how to troubleshoot this issue.
How to Fix Fill Handle Not Working in Excel Problem?
To resolve the problem with fill handle functionality, follow these easy methods:
Method 1- Enable File Handle Option
If the Excel fill series not working then the reason can be also that the fill handle option is not enabled. Although this feature is by default enabled but may be due to your mistake somehow it got disabled. So here is how to enable fill handle in Excel:
- Go to the File menu and then hit the Options tab. This will open the Excel Options window on your screen.
- Choose the Advanced option from the left pane of the Excel Options window.

- Now go to the section of Editing Options and put a checkmark across “Enable fill handle and cell drag-and-drop” option.
- Hit the OK button.

Method 2- Remove Applied Filters
Well, if you applied filters in your Excel worksheet, this makes the fill handle cause an issue. So, many users state that removing filters from the columns in the Excel workbook solves the issue, you can also do it. After removing the filters the fill handle begins working again.
Therefore, it is worth checking if you had added column filters rather than removing them and checking whether the Excel drag to “fill” not working – value is copied, formula ignored issue is solved or not.
However, if you are still facing the error then follow the next solution.
Also Read: Resolve Excel Flash Fill Not Working Issue Easily!
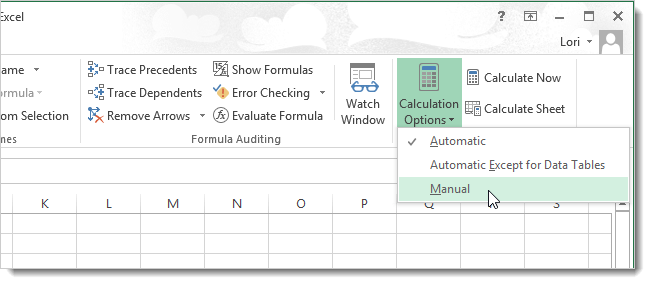
Method 3- Choose Automatic Calculation
Checking the Automatic in Formulas tab resolves the Excel Fill Handle not working properly for many users.
So here is how to do so:
- Go to the ‘Formulas’ tab
- And then go to the ‘Calculation Options’ from the drop-down menu
- Make sure ‘Automatic’ is checked.
Method 4- Check Data Consistency to Fix Fill Handle Not Working in Excel
Checking the data consistency is another crucial step that you need to take to solve this problem. Make sure that the data in your selected range is consistent & follows a pattern that Excel can identify. If there is any incorrect formatting found, do correct it, this may be preventing the fill handle feature from working.
Method 5- Using the Keyboard Shortcut
This solution is the easiest trick to solve Excel fill handle enabled but not working issue.

Select the cell value and press the F4 key 3 times doing this trick will solve the Excel fill handle issue. The fact behind this is when you choose a cell and then press the F4 key the last action that you have performed will get repeated. This last action can be anything like deleting rows, filling up data in cells, formatting, inserting, or doing changes in the shapes.
Also Read: Excel Freeze Panes Not Working Fixes- 2024 Guide!
Method 6- Ensure to Correct the Excel Settings
As already mentioned in the causes section, incorrect Excel settings or configurations can also hinder you when trying to use the Fill Handle function. Therefore, it is vital to check whether the Excel settings, like calculation options, file format settings, and other settings are configured correctly to ensure smooth spreadsheet operation.
How to Repair a Corrupted Excel Workbook?
If you are unable to perform any action in your Excel worksheet then chances are high that your Excel file got corrupted. So use the professionally recommended MS Excel Repair Tool to repair corrupt, damaged as well as errors in Excel files. This tool allows you to easily restore all objects from corrupt Excel files including the charts, worksheet properties cell comments, and other important data.
Other Key Features:
- With the help of this, you can fix all sorts of issues, corruption, and errors in Excel workbooks.
- This is a unique tool to repair multiple Excel files in one repair cycle and recover the entire data in a preferred location.
- It is easy to use and compatible with both Windows as well as Mac operating systems.
- This supports the entire Excel version and the demo version is free.
Steps To Use MS Excel Repair Tool:


How Do You AutoFill In Excel Without Dragging?
To quickly autofill in Excel without dragging you need to perform the following steps:
- Enter the number 1 in your worksheet cell A1.
- Follow this path: Home –> Editing –> Fill –> Series.
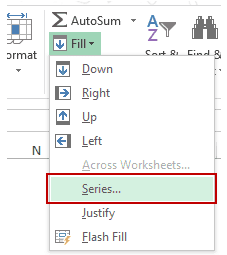
- Now in the opened dialog box of the series, you need to make the following selections:
Type: Linear
Stop Value: 1000
Series in: Columns
Step Value: 1
- Hit the OK button.
Now you will see that the cell from A1 to A1000 is filled with numbers 1 to 1000.
Related FAQs:
Where Is My Fill Handle in Excel?
The Fill Handle is a small square in the bottom right corner of your selected cell in a spreadsheet.
Can I Customize the Behavior of Fill Handle in Excel?
Yes, you can easily customize the behavior of a fill handle by correcting the Excel settings.
How Does a Fill Handle Work?
A fill handle is an excellent Excel feature that allows users to swiftly copy formulas or data down a column or a row.
What Is the Shape of The Fill Handle?
The fill handle in Excel is a small bold square in the lowest right corner of the selected cell.
Bottom Line
Well, the fill handle does not work in Excel spreadsheet can disrupt the workflow and ruin your spreadsheet experience. By understanding the roots and following the workable fixes outlined in this blog, you can resolve this issue effectively and ensure the smooth operation of the fill handle feature in the worksheet.
For further queries, you can visit our Facebook and Twitter pages.

Priyanka Sahu
Priyanka is a content marketing expert. She writes tech blogs and has expertise in MS Office, Excel, and other tech subjects. Her distinctive art of presenting tech information in the easy-to-understand language is very impressive. When not writing, she loves unplanned travels.